pwnKernel从0开始(一)

前言

网上一大堆教编译内核的,但由于我的水平太菜,很多教程我看得特别迷糊。还有第一次编译内核时,没设置好参数,直接把虚拟机编译炸开了。所以就想着能不能先做个一键获取内核源码和相关vmlinux以及bzImage的脚本,先试试题,后期再深入探究编译内核,加入debug符号什么的,所以就有了这个一键脚本。

这个直接看我的项目就好了,我是直接拖官方的docker,然后把编译所需要的环境都重新安装了一遍,基本可以适配所有环境,安装各个版本的内核,外加调试信息也可以配置

PIG-007/kernelAll (github.com)

前置环境,前置知识啥的在上面已经足够了,如果还是感觉有点迷糊可以再去搜搜其他教程。看雪的钞sir师傅和csdn上的ha1vk师傅就很不错啊,还有安全客上的ERROR404师傅

钞sir师傅:Ta的论坛 (pediy.com)

ha1vk师傅:kernel- CSDN搜索

error404师傅:Kernel Pwn 学习之路(一) - 安全客,安全资讯平台 (anquanke.com)

这个系列记录新的kernel解析,旨在从源码题目编写,不同内核版本来进行各式各样的出题套路解析和exp的解析。另外内核的pwn基本都是基于某个特定版本的内核来进行模块开发,而出漏洞地方就是这个模块,我们可以借助这个模块来攻破内核,所以我们进行内核pwn的时候,最应该先学习的就是一些简单内核驱动模块的开发。

一、例子编写

首先最简单和经典的的Hello world

1
2
3
4
5
6
7
8
9
10
11
12
13
14
15
16
17
18
19
//注释头

//由于基本都是用下载的内核编译,所以这里的头文件直接放到正常的编译器中可能找不到对应的头文件。
//在自己下载的编译好的内核中自己找对应的,然后Makefile中来设置内核源码路径
#include <linux/init.h>
#include <linux/module.h>
#include <linux/kernel.h>
MODULE_LICENSE("Dual BSD/GPL");
static int __init hello_init(void)
{
printk("PIG007:Hello world!\n");
return 0;
}
static void __exit hello_exit(void)
{
printk("PIG007:Bye,world\n");
}
module_init(hello_init);
module_exit(hello_exit);

1.头文件简介

module.h:包含可装载模块需要的大量符号和函数定义。

init.h:指定初始化模块方面和清除函数。

另外大部分模块还包括moduleparam.h头文件,这样就可以在装载的时候向模块传递参数。而我们常常用的函数_copy_from_user则来自头文件uaccess.h

2.模块许可证

1
2
3
//注释头

MODULE_LICENSE("Dual BSD/GPL");

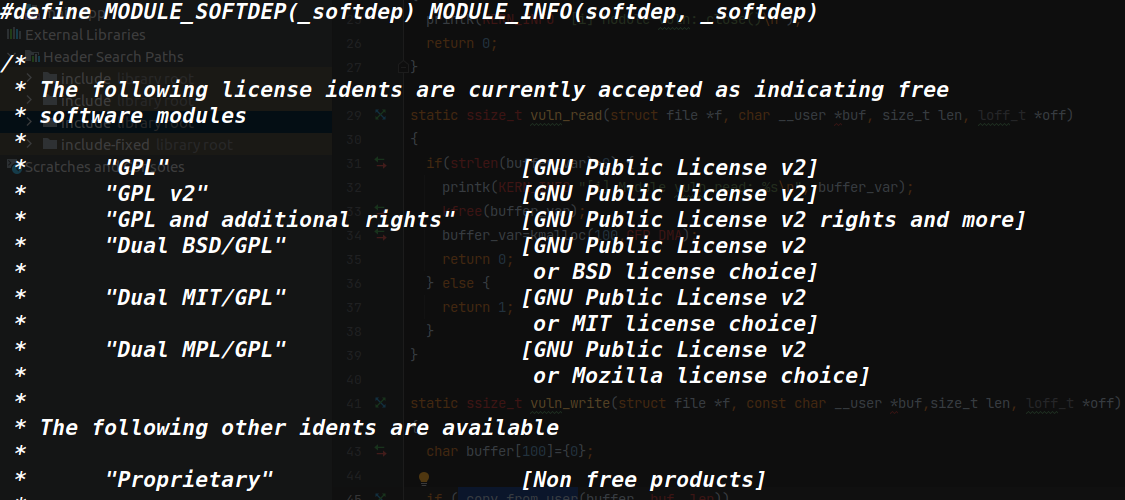
这个就是模块许可证,具体有啥用不太清楚,如有大佬恳请告知。可以通过下列命令查询

1
grep "MODULE_LICENSE" -B 27 /usr/src/linux-headers-`uname -r`/include/linux/module.h

image-20210927100912684

或者网址Linux内核许可规则 — The Linux Kernel documentation

3.模块加载卸载

加载

一般以 __init标识声明,返回值为0表示加载成功,为负数表示加载失败。用来初始化,定义之类的。

1
static int __init hello_init(void)

在整个模块的最后加上

1
module_init(hello_init);

来通过这个init函数加载模块

卸载

一般以 __exit标识声明,用来释放空间,清除一些东西的。

1
static void __exit hello_exit(void) 

同样的模块最后加上以下代码来卸载

1
module_exit(hello_exit);

▲其实加载和卸载有点类似于面向对象里的构造函数和析构函数。

以上是一个最简单的例子,下面讲讲实际题目的编写,实际的题目一般涉及驱动的装载。

二、题目编写

由于模块装载是在内核启动时完成的(root下也可以设置再insmod装载),所以一般需要安装驱动,通过驱动来启动模块中的代码功能。而驱动类型也一般有两种,一种是字符型设备驱动,一种是globalmem虚拟设备驱动。

分配得到的设备号可由cat /proc/devices来查看
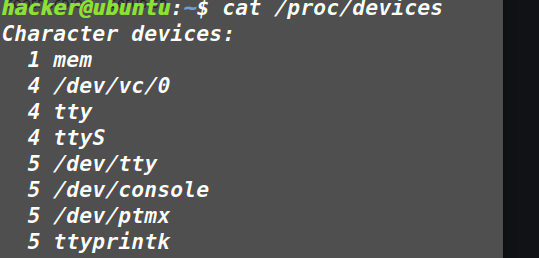
image-20220330164118552

1.字符型设备驱动

(1)安装套路

首先了解一下驱动设备的结构体:

1
2
3
4
5
6
7
8
9
10
///linux/cdev.h   kernel 5.14.8

struct cdev {
struct kobject kobj; // 内嵌的kobject对象
struct module *owner; // 所属模块
const struct file_operations *ops; // 文件操作结构体,用来进行交互
struct list_head list;
dev_t dev; // 设备号
unsigned int count;
} __randomize_layout;

然后就是套路编写

1
2
3
4
5
6
7
8
9
10
11
12
13
14
15
16
17
18
19
20
21
22
23
24
25
26
27
28
29
30
31
32
33
34
// 设备结构体
struct xxx_dev_t {
struct cdev cdev;
} xxx_dev;

// 设备驱动模块加载函数
static int __init xxx_init(void)
{
char* DEV_NAME = 'PIG-007';
// 初始化cdev
cdev_init(&xxx_dev.cdev, &xxx_fops);
xxx_dev.cdev.owner = THIS_MODULE;

// 获取字符设备号
if (xxx_major) {
//使用指定的设备号进行分配,xxx_dev_no为设备号,1为设备个数
register_chrdev_region(xxx_dev_no, 1, DEV_NAME);
} else {
alloc_chrdev_region(&xxx_dev_no, 1, DEV_NAME);
}
//申请设备号常用alloc_chrdev_region,表动态申请设备号
//如果指定分配的时候如果占用了就容易出错

// 注册设备
ret = cdev_add(&xxx_dev.cdev, xxx_dev_no, 1);

}
// 设备驱动模块卸载函数
static void __exit xxx_exit(void)
{
// 释放占用的设备号
unregister_chrdev_region(xxx_dev_no, 1);
cdev_del(&xxx_dev.cdev);
}

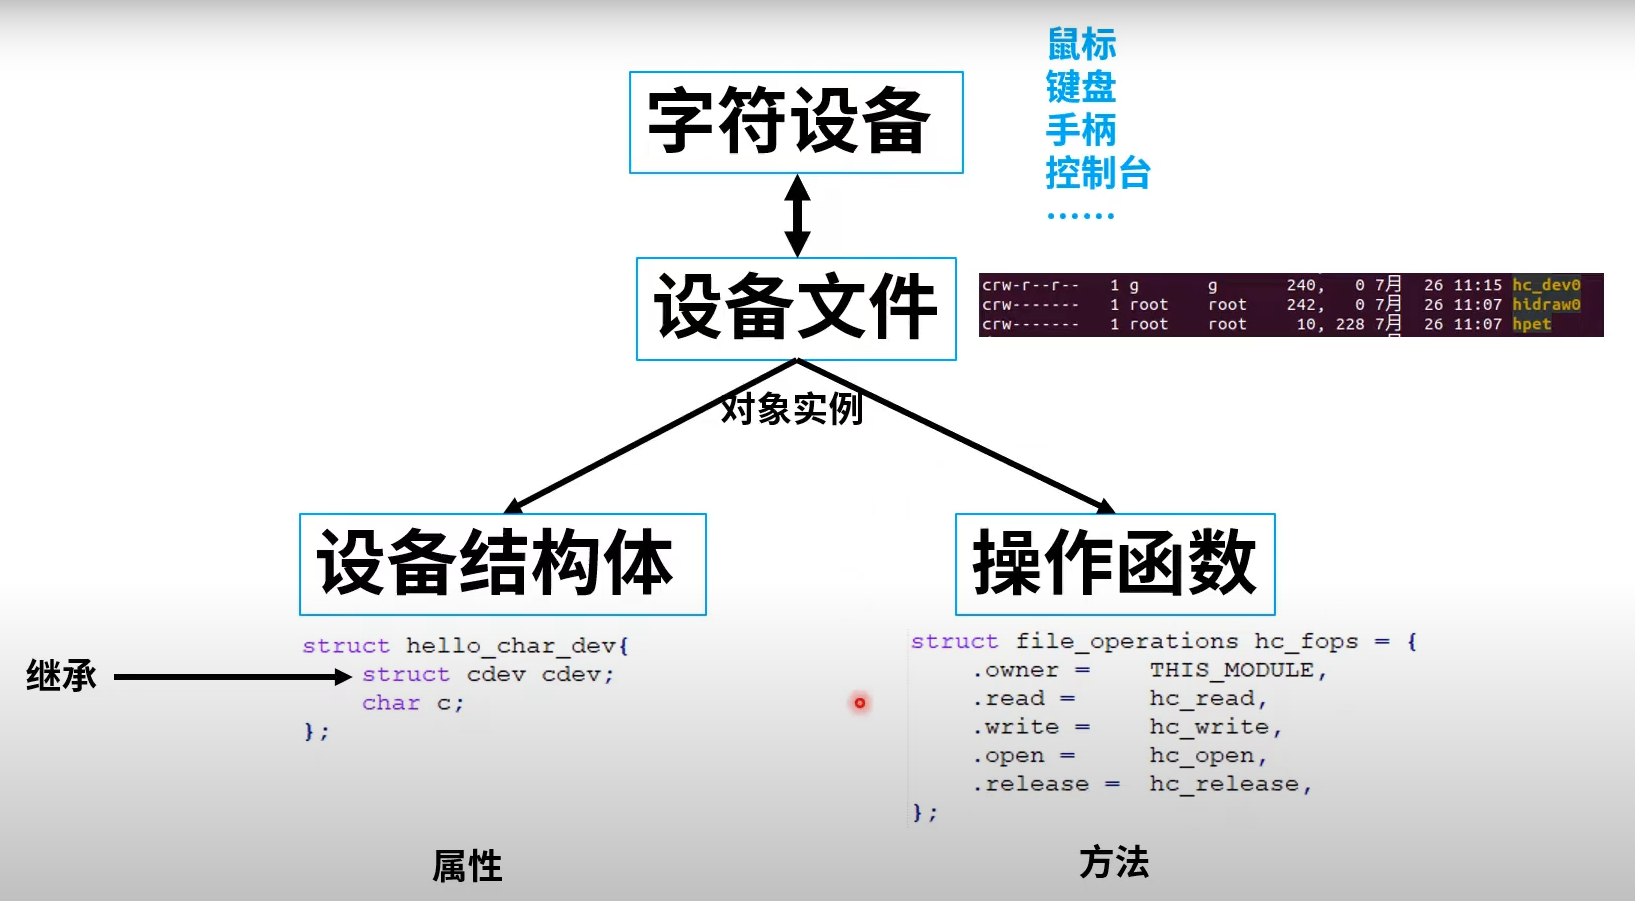
这样简单的驱动就安装完了,安装完了之后,我们想要使用这个驱动的话,还需要进行交互,向驱动设备传递数据,所以上面的xxx_fops,即file_operations这个结构体就起到了这个功能。

有的时候安装注册设备驱动需要用到class来创建注册,原因未知:

1
2
3
4
5
6
7
8
9
10
11
12
13
14
15
16
17
18
19
20
21
22
23
24
25
26
27
28
29
30
31
32
33
static int __init xxx_init(void)
{
buffer_var=kmalloc(100,GFP_DMA);
printk(KERN_INFO "[i] Module xxx registered");
if (alloc_chrdev_region(&dev_no, 0, 1, "xxx") < 0)
{
return -1;
}
if ((devClass = class_create(THIS_MODULE, "chardrv")) == NULL)
{
unregister_chrdev_region(dev_no, 1);
return -1;
}
if (device_create(devClass, NULL, dev_no, NULL, "xxx") == NULL)
{
printk(KERN_INFO "[i] Module xxx error");
class_destroy(devClass);
unregister_chrdev_region(dev_no, 1);
return -1;
}
cdev_init(&cdev, &xxx_fops);
if (cdev_add(&cdev, dev_no, 1) == -1)
{
device_destroy(devClass, dev_no);
class_destroy(devClass);
unregister_chrdev_region(dev_no, 1);
return -1;
}

printk(KERN_INFO "[i] <Major, Minor>: <%d, %d>\n", MAJOR(dev_no), MINOR(dev_no));
return 0;

}

(2)交互套路

安装完成之后还需要交互,用到file_operations结构体中的成员函数,首先了解下这个结构体。

1
2
3
4
5
6
7
8
9
10
11
12
13
14
15
16
17
18
19
20
21
22
23
24
25
26
27
28
29
30
31
32
33
34
35
36
37
38
39
40
41
42
43
///linux/fs.h 	kernel 5.14.8

struct file_operations {
struct module *owner;
loff_t (*llseek) (struct file *, loff_t, int);
ssize_t (*read) (struct file *, char __user *, size_t, loff_t *);
ssize_t (*write) (struct file *, const char __user *, size_t, loff_t *);
ssize_t (*read_iter) (struct kiocb *, struct iov_iter *);
ssize_t (*write_iter) (struct kiocb *, struct iov_iter *);
int (*iopoll)(struct kiocb *kiocb, bool spin);
int (*iterate) (struct file *, struct dir_context *);
int (*iterate_shared) (struct file *, struct dir_context *);
__poll_t (*poll) (struct file *, struct poll_table_struct *);
long (*unlocked_ioctl) (struct file *, unsigned int, unsigned long);
long (*compat_ioctl) (struct file *, unsigned int, unsigned long);
int (*mmap) (struct file *, struct vm_area_struct *);
unsigned long mmap_supported_flags;
int (*open) (struct inode *, struct file *);
int (*flush) (struct file *, fl_owner_t id);
int (*release) (struct inode *, struct file *);
int (*fsync) (struct file *, loff_t, loff_t, int datasync);
int (*fasync) (int, struct file *, int);
int (*lock) (struct file *, int, struct file_lock *);
ssize_t (*sendpage) (struct file *, struct page *, int, size_t, loff_t *, int);
unsigned long (*get_unmapped_area)(struct file *, unsigned long, unsigned long, unsigned long, unsigned long);
int (*check_flags)(int);
int (*flock) (struct file *, int, struct file_lock *);
ssize_t (*splice_write)(struct pipe_inode_info *, struct file *, loff_t *, size_t, unsigned int);
ssize_t (*splice_read)(struct file *, loff_t *, struct pipe_inode_info *, size_t, unsigned int);
int (*setlease)(struct file *, long, struct file_lock **, void **);
long (*fallocate)(struct file *file, int mode, loff_t offset,
loff_t len);
void (*show_fdinfo)(struct seq_file *m, struct file *f);
#ifndef CONFIG_MMU
unsigned (*mmap_capabilities)(struct file *);
#endif
ssize_t (*copy_file_range)(struct file *, loff_t, struct file *,
loff_t, size_t, unsigned int);
loff_t (*remap_file_range)(struct file *file_in, loff_t pos_in,
struct file *file_out, loff_t pos_out,
loff_t len, unsigned int remap_flags);
int (*fadvise)(struct file *, loff_t, loff_t, int);
} __randomize_layout;

具体一点使用如下

image-20220330164350249

参考:https://www.youtube.com/watch?v=EJ0JQKvxf70&list=PLEJtkJ02eJVX9I66wJD1tn07R52DxVXG0&index=4

其中常用的就是read,write等函数。

之后也是正常的调用函数,套路编写

1
2
3
4
5
6
7
8
9
10
11
12
13
14
15
16
17
18
19
20
21
22
23
24
25
26
27
28
29
30
31
32
33
34
// 读设备
ssize_t xxx_read(struct file *filp, char __user *buf, size_t count,
loff_t *f_pos)
{
...
copy_to_user(buf, ..., ...); // 内核空间到用户空间缓冲区的复制
...
}
// 写设备
ssize_t xxx_write(struct file *filp, const char __user *buf,
size_t count, loff_t *f_pos)
{
...
copy_from_user(..., buf, ...); // 用户空间缓冲区到内核空间的复制
...
}

// ioctl函数命令控制
long xxx_ioctl(struct file *filp, unsigned int cmd, unsigned long arg)
{
...
switch (cmd) {
case XXX_CMD1:
...
break;
case XXX_CMD2:
...
break;
default:
// 不支持的命令
return -ENOTTY;
}
return 0;
}

然后需要file_operations结构体中的函数来重写用户空间的write,open,read等函数:

1
2
3
4
5
6
7
8
static struct file_operations xxx_fops =
{
.owner = THIS_MODULE,
// .open = xxx_open,
// .release = xxx_close,
.write = xxx_write,
.read = xxxx_read
};

这样当用户空间打开该设备,调用该设备的write函数,就能通过.write进入到xxx_write函数中。

▲这样一些常规kernel题的编写模板就总结出来了。

(3)具体的题目

原题:https://github.com/black-bunny/LinKern-x86_64-bypass-SMEP-KASLR-kptr_restric

①代码和简单的解析

1
2
3
4
5
6
7
8
9
10
11
12
13
14
15
16
17
18
19
20
21
22
23
24
25
26
27
28
29
30
31
32
33
34
35
36
37
38
39
40
41
42
43
44
45
46
47
48
49
50
51
52
53
54
55
56
57
58
59
60
61
62
63
64
65
66
67
68
69
70
71
72
73
74
75
76
77
78
79
80
81
82
83
84
85
86
87
88
89
90
91
92
93
94
95
96
97
98
99
100
101
102
103
104
105
106
107
108
109
110
111
112
113
#include <linux/module.h>
#include <linux/version.h>
#include <linux/kernel.h>
#include <linux/types.h>
#include <linux/kdev_t.h>
#include <linux/fs.h>
#include <linux/device.h>
#include <linux/cdev.h>
#include <asm/uaccess.h>
#include <linux/slab.h>

//正常的设置了dev_t和cdev,但是这里使用的class这个模板来创建设备驱动
//高12位为主设备号,低20位为次设备号
static dev_t first; // Global variable for the first device number
static struct cdev c_dev; // Global variable for the character device structure
static struct class *cl; // Global variable for the device class
static char *buffer_var;

//打开关闭设备的消息提示函数
static int vuln_open(struct inode *i, struct file *f)
{
printk(KERN_INFO "[i] Module vuln: open()\n");
return 0;
}
static int vuln_close(struct inode *i, struct file *f)
{
printk(KERN_INFO "[i] Module vuln: close()\n");
return 0;
}

//从buffer_var中读取数据
static ssize_t vuln_read(struct file *f, char __user *buf, size_t len, loff_t *off)
{
if(strlen(buffer_var)>0) {
printk(KERN_INFO "[i] Module vuln read: %s\n", buffer_var);
kfree(buffer_var);
buffer_var=kmalloc(100,GFP_DMA);
return 0;
} else {
return 1;
}
}
//向buffer中写入数据,然后拷贝给buffer_var,这里就是漏洞存在点。
//由于len和buf都是我们可以控制的,而buffer是栈上的数据,长度为100。
//所以我们可以通过len和buf,将数据复制给buffer从而进行栈溢出。
static ssize_t vuln_write(struct file *f, const char __user *buf,size_t len, loff_t *off)
{
char buffer[100]={0};
if (_copy_from_user(buffer, buf, len))
return -EFAULT;
buffer[len-1]='\0';
printk("[i] Module vuln write: %s\n", buffer);
strncpy(buffer_var,buffer,len);
return len;//返回值不能为0,不然会一直调用该函数
}

//file_operations结构体初始化
static struct file_operations pugs_fops =
{
.owner = THIS_MODULE,
.open = vuln_open,
.release = vuln_close,
.write = vuln_write,
.read = vuln_read
};

//驱动设备加载函数
static int __init vuln_init(void) /* Constructor */
{
buffer_var=kmalloc(100,GFP_DMA);
printk(KERN_INFO "[i] Module vuln registered");
if (alloc_chrdev_region(&first, 0, 1, "vuln") < 0)
{
return -1;
}
if ((cl = class_create(THIS_MODULE, "chardrv")) == NULL)
{
unregister_chrdev_region(first, 1);
return -1;
}
if (device_create(cl, NULL, first, NULL, "vuln") == NULL)
{
printk(KERN_INFO "[i] Module vuln error");
class_destroy(cl);
unregister_chrdev_region(first, 1);
return -1;
}
cdev_init(&c_dev, &pugs_fops);
if (cdev_add(&c_dev, first, 1) == -1)
{
device_destroy(cl, first);
class_destroy(cl);
unregister_chrdev_region(first, 1);
return -1;
}

printk(KERN_INFO "[i] <Major, Minor>: <%d, %d>\n", MAJOR(first), MINOR(first));
return 0;
}

//驱动设备卸载函数
static void __exit vuln_exit(void) /* Destructor */
{
unregister_chrdev_region(first, 3);
printk(KERN_INFO "Module vuln unregistered");
}

module_init(vuln_init);
module_exit(vuln_exit);

MODULE_LICENSE("GPL");
MODULE_AUTHOR("blackndoor");
MODULE_DESCRIPTION("Module vuln overflow");

②内核函数解析

printk:
1
printk(日志级别 "消息文本");

其中日志级别定义如下:

1
2
3
4
5
6
7
8
#defineKERN_EMERG "<0>"/*紧急事件消息,系统崩溃之前提示,表示系统不可用*/
#defineKERN_ALERT "<1>"/*报告消息,表示必须立即采取措施*/
#defineKERN_CRIT "<2>"/*临界条件,通常涉及严重的硬件或软件操作失败*/
#define KERN_ERR "<3>"/*错误条件,驱动程序常用KERN_ERR来报告硬件的错误*/
#define KERN_WARNING "<4>"/*警告条件,对可能出现问题的情况进行警告*/
#define KERN_NOTICE "<5>"/*正常但又重要的条件,用于提醒。常用于与安全相关的消息*/
#define KERN_INFO "<6>"/*提示信息,如驱动程序启动时,打印硬件信息*/
#define KERN_DEBUG "<7>"/*调试级别的消息*/
kmalloc:
1
static inline void *kmalloc(size_t size, gfp_t flags)

其中flags一般设置为GFP_KERNEL或者GFP_DMA,在堆题中一般就是

GFP_KERNEL模式,如下:

 |– 进程上下文,可以睡眠     GFP_KERNEL
 |– 进程上下文,不可以睡眠    GFP_ATOMIC
 |  |– 中断处理程序       GFP_ATOMIC
 |  |– 软中断          GFP_ATOMIC
 |  |– Tasklet         GFP_ATOMIC
 |– 用于DMA的内存,可以睡眠   GFP_DMA | GFP_KERNEL
 |– 用于DMA的内存,不可以睡眠  GFP_DMA |GFP_ATOMIC

具体可以看

Linux内核空间内存申请函数kmalloc、kzalloc、vmalloc的区别【转】 - sky-heaven - 博客园 (cnblogs.com)

kzmalloc类似,就是分配空间并且内存初始化为0

kfree:

这个就不多说了,就是简单的释放。

copy_from_user:
1
copy_from_user(void *to, const void __user *from, unsigned long n)
copy_to_user:
1
copy_to_user(void __user *to, const void *from, unsigned long n)

这两个就不讲了,顾名思义。

注册函数

剩下的好多就是常见的注册函数了

1
2
3
4
5
6
alloc_chrdev_region(&t_dev, 0, 1, "xxx");//动态分配主设备号
unregister_chrdev_region(t_dev, 1);//移除模块时释放设备号
xxx_class = class_create(THIS_MODULE, "xxx");
device_create(xxx_class, NULL, devno, NULL, "xxx");
cdev_init(&c_dev, &pugs_fops);
cdev_add(&c_dev, t_dev, 1);

2.globalmem虚拟设备驱动

这个不太清楚,题目见的也少,先忽略。

3.块设备

register_blkdev

申请设备号

1
int ret = register_blkdev(xxx_dev_no,DEV_NAME);
  • 如果xxx_dev_no为0则由该函数自动分配设备号,ret即为返回的设备号
  • xxx_dev_no不为0则依据该设备号进行分配

unregister_blkdev

释放设备号

1
unregister_blkdev(xxx_dev_no,DEV_NAME);

printk()函数的总结 - 深蓝工作室 - 博客园 (cnblogs.com)

Linux kernel pwn notes(内核漏洞利用学习) - hac425 - 博客园 (cnblogs.com)

Linux设备驱动(二)字符设备驱动 | BruceFan’s Blog (pwn4.fun)